p.5 #1 · The how-would-you-process-my-image thread
There was some discussion on Alternative Image Thread about blue shadows and how to handle them. I think photo processing discussion is better done here, and since this image is never going to be worth anything I have no issues giving the RAW-file to public.
Script:
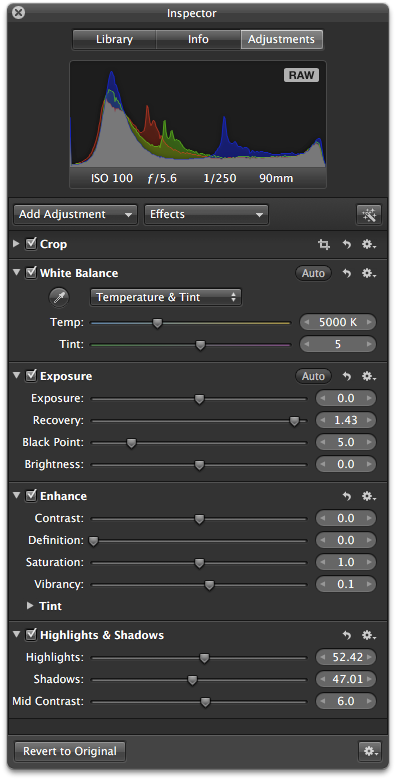
1. In Apple Aperture this required heavy slider moving (usually I don't do anything else than WB so this represents "extreme PP" for me). You can see values I used from picture below, numbers in brackets represent Apple Aperture default value: Recovery (0), Blackpoint (3), Vibrancy (0), Highlights (0), Shadows (0), Mid Contrast (0).
2. Image exported as 16-bit AdobeRGB TIFF from Apple Aperture
2. Resize to fit into 972x972 square with ImageMagick using Lanczos (convert image.tiff -define filter:filter=Lanczos -resize '972x972' image972.tif)
3. In PhotoShop change color profile to gamma 1 profile, USM 200% 0.2px save back to TIFF
4. Convert TIFF to JPG with ImageMagick (convert image972.tif -quality 92 image972.jpg)
Color sample of tree with Kodak Q60 color target - color should be very accurate at least near the location of Q60 color target:
Double processed the raw file for color and detail in foreground vs sky. Brought out more blues in foreground and did dodging and burning on dunes. Warmed up sky and worked on the color.
p.5 #6 · The how-would-you-process-my-image thread
Love this image. Very moody.
I thought I would try a different tack than Zaitz's and go with more local contrast and detail so I did a single image tone map in Photomatix and then cleaned it up in PS with some contrast adjustment and slight noise reduction.
p.5 #7 · The how-would-you-process-my-image thread
Samuli
Must bow to your resizing skills. And ablity to use ImageMagick. I know how to use old DOS command line, but in this case Im bit clueless how to use that thing.. Mine is resized using Lanczos too, but somehow you have way more details than I. Tho I dont know how high was original sharpening (maybe I should tune it up notch or two).
Anyway, my take on your really difficult photo.. saved as JPEG lvl10.
Edit: Re-uploaded different version. Figured out which kind of Lanczos you are using. Tho I didnt use it.
p.5 #14 · The how-would-you-process-my-image thread
15bit, The Kodak Q60 patch colors are known (Kodak lists them on ftp-site), so it can be used for many purposes. For example back in ~2003 (or so, can't remember exactly) there was one guy who made Excel-macro what created ultra high quality ICC profile (the ICC profiles made with commercial cheap programs are generally very bad quality, based to small mapping tables, which most likely cause as many issues as they solve). Also this target is quite good for manual evaluation assuming you have good monitor and monitor profiler. And it's publicly available (or at least was), thou quite expensive (~100USD), so it's quite good reference for colours, I use it sometimes, but only when I'm carrying Kata Ul-222 bag since I keep it there
For this "color reference photo" I used it to see do I need to change anything else than white balance and tint (based on color picker RGB values compared against my memory of what kind of values I should get from few control colors I use frequently).
Mescalamba, I don't add any sharpening to RAWs (Apple Aperture has "box" which I can add to adjustments, but it's sharpening is awful, similar to Lightrooms sharpening, thou I haven't tried that for few years). I get similar sharpness and detail no matter RAW-converter I use, it's just question how one resizes the image. Based on my findings there are two methods which work: Lanczos and step sharpening. The "bicubic" and other methods make the small textures disappear and make images look bad - adding sharpening in final size to that textureless image just enhances the edges but does nothing to textures. Some discussion about ImageMagic was in Sharpening for non-PS users.
Zaits, your sunset photo is really nice, thanks for sharing. Thou it was difficult - nothing worked which works with 5DmkII files. No matter how I turned sliders in Apple Aperture I could not get what I wanted (almost got but then there was side effect of "halo" above the dunes in middle distance similar as Taylor's image). So I exported -1.3EV, 0EV, 1.3EV and combined in PhotoMatix Pro tone mapping and finalized in PhotoShop (removed sensor dust, adjusted black point and gamma).
That is a beautiful shot. And beautifully developed too looking at the contributions posted.
Almost nothing to add except for one thing which annoys me with that image. Things are *supposed* to get lighter the further back you goes to create depth. The foreground dunes in the original almost does the opposite. Hence I had to try to reverse that somewhat - to see what depth I got. Here's the result.
Sort of hard to notice if you dont compare two images, but it is at least different depth-wise. Compare for example with Samulis version just above. Comparing these two makes his version look like a cloud is covering the mid distance. At least to me
Fill-light was only ACR action. Then in PS: Three Levels and a graduated filter on each. And finally a color layer.


 Tho I didnt use it.


