This topic is in the 2022 archive. You can read it and like its posts here. It is read only.
Archive 2022Learning Leica "M", a 30 day project

p.17 #1Learning Leica "M", a 30 day project
1bwana1 wrote:
Day 22 Image:
Ooh-Ra!!!!!
In the spirit of Allen's (airfrogUSMC) advice I went out with just the 28mm f/2 Ultron v1 on my Leica M10-P. Whatever I ran into I would need to find a composition to make that lens work. I also followed the advise of setting the Aperture to f/8, the Shutter Speed to 1/500 sec, ISO to 200, because it was a bright full sun day. So, when I saw something to shoot I could react instantly, bring the camera to my eye, focus if needed but mostly rely on DOF and Zone Focus, and take the shot....Show more →
S/F well done.
Day 22 Image:
Ooh-Ra!!!!!
In the spirit of Allen's (airfrogUSMC) advice I went out with just the 28mm f/2 Ultron v1 on my Leica M10-P. Whatever I ran into I would need to find a composition to make that lens work. I also followed the advise of setting the Aperture to f/8, the Shutter Speed to 1/500 sec, ISO to 200, because it was a bright full sun day. So, when I saw something to shoot I could react instantly, bring the camera to my eye, focus if needed but mostly rely on DOF and Zone Focus, and take the shot....Show more →


S/F well done.
Mar 14, 2022 at 07:20 AM
p.17 #2Learning Leica "M", a 30 day project
Day 23 Image:
I am still limiting myself to the 28mm today. But as this is a "Learning Leica" thread I do want to explore some of the less commented on features of the M10-P. The one I wanted to test out today was the Leica Photo App, in particular the remote shooting function. I was racking my brain on what to shoot using this set of features. Then the idea of going down to the local Dog park, to see what I could get image wise.
The shot I envisioned was from a low angle down on the dog's level. So, I brought along my table top tripod to mount the camera on. I set this down on a concrete slab under a picnic table, then sat comfortable in the shade at the table, with the dogs owners for a visit. I connected the app to the camera, and watched for an interesting shot of a dog. The dogs were pretty hyperactive chasing each other around, so far fewer opportunities than I expected. I set the camera up for a fairly close focus point, and a smaller DOF to slightly soften the background and keep attention on the intended dog. Since the camera just sat there it attracted no attention from the dogs. This was good in that they left it alone. On the other hand they never even really looked at it so I could get a picture with eye contact. If I did this again I will have to figure that out.
I will say that I really like the Leica Photo App. It is much easier to use than the one Sony provides. Connecting is intuitive and easy. The camera never lost connection or had even a hiccup during the 1/2 hour or so I used it. The app gives you pretty much full control of the camera except of course focus and aperture. I can see using this for many uses. Most obviously as a remote shutter release when shooting long exposure on a tripod. I can see myself sitting in my car in bad weather watching the light, and clicking off images. It also gives you access to the photographs on your phone so sharing as you shoot is instant and easy. I highly recommend you all explore this app if your camera supports it.
This clicks the tested box for one more feature. Just a few more to go.
I do like the balls scattered through the image, the other dogs playing in the background, and the shadow of the person the dog is looking at.
Enjoy the image.
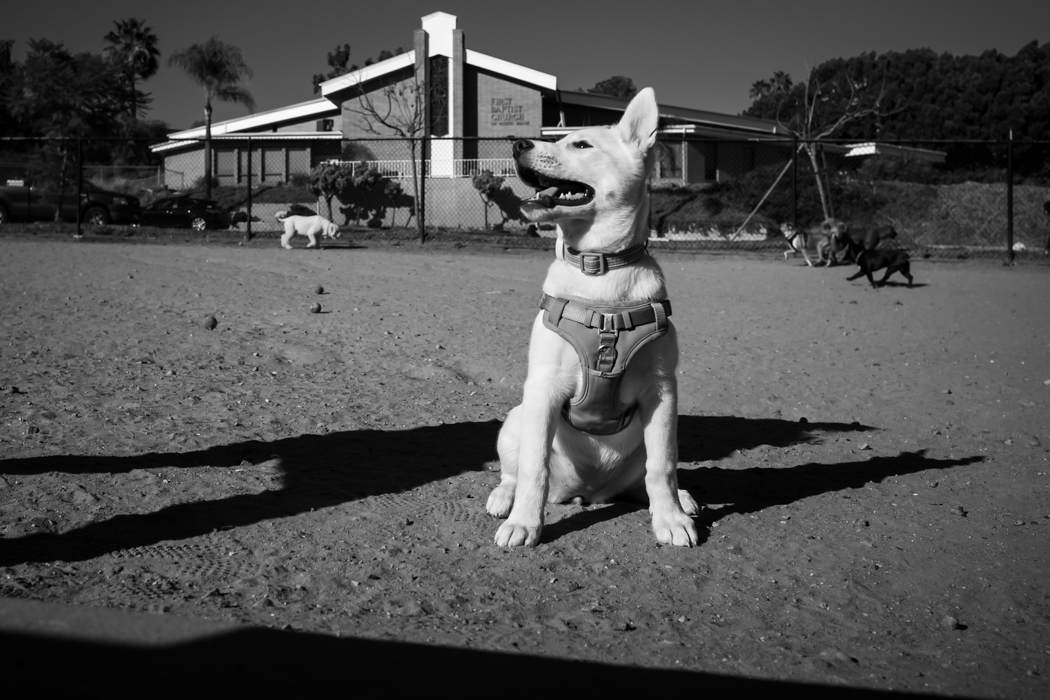
Leica M10-P, Voigtlander 28mm f/2 Ultron v1, f/5.6, 1/2000 sec, ISO 400, AWB, Tripod, Shot w/ Leica Photo App remotely
I am still limiting myself to the 28mm today. But as this is a "Learning Leica" thread I do want to explore some of the less commented on features of the M10-P. The one I wanted to test out today was the Leica Photo App, in particular the remote shooting function. I was racking my brain on what to shoot using this set of features. Then the idea of going down to the local Dog park, to see what I could get image wise.
The shot I envisioned was from a low angle down on the dog's level. So, I brought along my table top tripod to mount the camera on. I set this down on a concrete slab under a picnic table, then sat comfortable in the shade at the table, with the dogs owners for a visit. I connected the app to the camera, and watched for an interesting shot of a dog. The dogs were pretty hyperactive chasing each other around, so far fewer opportunities than I expected. I set the camera up for a fairly close focus point, and a smaller DOF to slightly soften the background and keep attention on the intended dog. Since the camera just sat there it attracted no attention from the dogs. This was good in that they left it alone. On the other hand they never even really looked at it so I could get a picture with eye contact. If I did this again I will have to figure that out.
I will say that I really like the Leica Photo App. It is much easier to use than the one Sony provides. Connecting is intuitive and easy. The camera never lost connection or had even a hiccup during the 1/2 hour or so I used it. The app gives you pretty much full control of the camera except of course focus and aperture. I can see using this for many uses. Most obviously as a remote shutter release when shooting long exposure on a tripod. I can see myself sitting in my car in bad weather watching the light, and clicking off images. It also gives you access to the photographs on your phone so sharing as you shoot is instant and easy. I highly recommend you all explore this app if your camera supports it.
This clicks the tested box for one more feature. Just a few more to go.
I do like the balls scattered through the image, the other dogs playing in the background, and the shadow of the person the dog is looking at.
Enjoy the image.
Leica M10-P, Voigtlander 28mm f/2 Ultron v1, f/5.6, 1/2000 sec, ISO 400, AWB, Tripod, Shot w/ Leica Photo App remotely
Mar 14, 2022 at 08:42 PM
p.17 #3Learning Leica "M", a 30 day project
Day 24 Image:
One thing I want to work on is shooting into the light. I would like to learn to manage Sun Stars, and flare for both color and B&W images. I find that I often like this effect in images. But, I really don't have a feel on how to to this in my images in an attractive way.
In today's image I made an attempt at this. Along the cliffs here in La Jolla the City has built a number of Gazebos for people to sit in and enjoy the views. This is an image of one of them. I do like the graphic nature of this image, the story it tells, and the high contrast. I am happy with the composition and the focus.
I didn't want to darken the image so much that the shadows had no detail and it was basically just a silhouette with no texture in the wood and the rocks. I did manage that. However, this meant that I completely blew out good sized portions of the sky. How can I avoid that, or is that OK in such images? I stopped down the aperture to f/16 to get a Sun Star. I did manage to get a half decent one by positioning in on the edge of the gazebo. I would have prefered if it was more defined. The small aperture meant I had to have a high ISO of 2000 in order to keep the SS at my hand hold limit of 1/250 sec. I don't think noise is an issue because of this however.
I would love for those with experience in sh0oting into the light could post their tips and techniques for doing this. I am here to learn.
Enjoy the image.
Thanks,
-Steve-
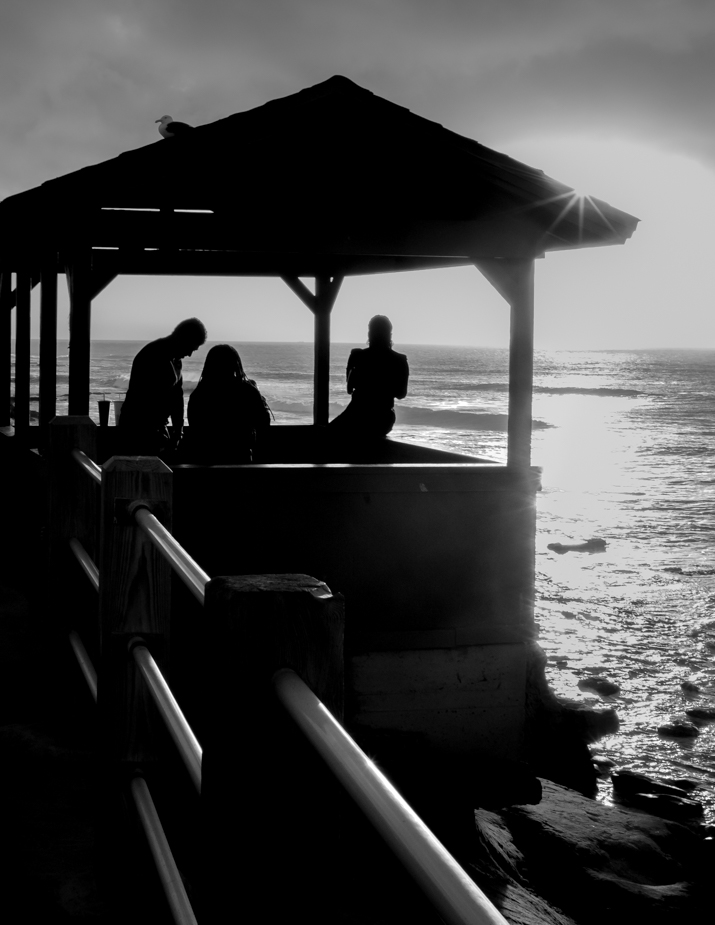
Leica M10-P, Voigtlander 50mm f/1.5 Nokton vII MC, f/16, 1/250 sec, ISO 2000, Hand Held
One thing I want to work on is shooting into the light. I would like to learn to manage Sun Stars, and flare for both color and B&W images. I find that I often like this effect in images. But, I really don't have a feel on how to to this in my images in an attractive way.
In today's image I made an attempt at this. Along the cliffs here in La Jolla the City has built a number of Gazebos for people to sit in and enjoy the views. This is an image of one of them. I do like the graphic nature of this image, the story it tells, and the high contrast. I am happy with the composition and the focus.
I didn't want to darken the image so much that the shadows had no detail and it was basically just a silhouette with no texture in the wood and the rocks. I did manage that. However, this meant that I completely blew out good sized portions of the sky. How can I avoid that, or is that OK in such images? I stopped down the aperture to f/16 to get a Sun Star. I did manage to get a half decent one by positioning in on the edge of the gazebo. I would have prefered if it was more defined. The small aperture meant I had to have a high ISO of 2000 in order to keep the SS at my hand hold limit of 1/250 sec. I don't think noise is an issue because of this however.
I would love for those with experience in sh0oting into the light could post their tips and techniques for doing this. I am here to learn.
Enjoy the image.
Thanks,
-Steve-
Leica M10-P, Voigtlander 50mm f/1.5 Nokton vII MC, f/16, 1/250 sec, ISO 2000, Hand Held
Mar 15, 2022 at 07:16 PM
p.17 #4Learning Leica "M", a 30 day project
1bwana1 wrote:
Day 24 Image:
24 out of 24, keep it up and much respect for continuing to push yourself! I love the sly seagull in this image and how it looks toward the left, contrasting the people, and yet how its wing blends in silhouette with the roof.
Day 24 Image:
24 out of 24, keep it up and much respect for continuing to push yourself! I love the sly seagull in this image and how it looks toward the left, contrasting the people, and yet how its wing blends in silhouette with the roof.
Mar 16, 2022 at 06:48 AM
p.17 #5Learning Leica "M", a 30 day project
Steve, I do it but be careful of your highlights. With Leica M the shadows are there but the highlights are not so forgiving. The highlights are at least 2 stops to hot in this image you posted if you wanted to hold some detail. I would probably would have shot this at ISO 200 at f/16 at 250th or maybe 1/500 and pulled up the shadows.
I found a couple of examples I shot late last year. Not saying they are great shots but they do show how I handle highlights with Leica M digital. They are over in the Leica Alt Monochrom(e) Images thread. I put info on the shots to.
And again Winogrand on single photographs telling stories.
To point at about 1:24 through about 2:26
I found a couple of examples I shot late last year. Not saying they are great shots but they do show how I handle highlights with Leica M digital. They are over in the Leica Alt Monochrom(e) Images thread. I put info on the shots to.
And again Winogrand on single photographs telling stories.
To point at about 1:24 through about 2:26
Mar 16, 2022 at 08:41 AM
p.17 #6Learning Leica "M", a 30 day project
1bwana1 wrote:
Day 24 Image:
One thing I want to work on is shooting into the light. I would like to learn to manage Sun Stars, and flare for both color and B&W images. I find that I often like this effect in images. But, I really don't have a feel on how to to this in my images in an attractive way.
In today's image I made an attempt at this. Along the cliffs here in La Jolla the City has built a number of Gazebos for people to sit in and enjoy the views. This is an image of one of them....Show more →
Hi Steve,
I like this shot but agree with Allen that it is over exposed. Remember your sunny f/16 rule which is really easy in this image since you are shooting at f/16 and you are shooting into the sun. That means your SS should be 1/ISO or close to that for good exposure. That means you are about 3 stops over exposed according to the sunny f/16 rule of thumb and that looks about right here. I would have shot at ISO 200 with a 1/250 SS to protect the highlights, or course that give you more dynamic range and a better opportunity to pull up the shadows as well as you protect the highlights. As Allen suggests always protect the highlights with your Leica M10-P as it is easy to blow them, and you could easily pull up the shadows 3 or 4 stops on this image in post if you felt that was needed, or at least I think you could have especially in B & W.
I should probably also say that you don't need f/16 to get sunstars with a Voigtlander lens with 10 straight blades. You typically get nice sunstars starting at f/5.6 with these lenses. So, I probably would not have shot at f/16. I would have tried f/11 with a 1/500 shutter speed and f/8 with a 1/1000 shutter speed, but I would have kept ISO 200 to protect the highlights in either case.
Different lenses have good sunstars at different apertures. The Voigtlander lenses with 10 straight blades get them quite early, but some of the Leica lenses with curved blades do need smaller apertures. For example with my 21 SEM I would try f/11 if I was looking for sunstars, but might well need f/16. The 21 SEM has 9 curved blades with 18 point sunstars and with that aperture arrangement you need to stop down a lot further to get nice sunstars.
I hope some of this helps and isn't just repeating things you already know.
Day 24 Image:
One thing I want to work on is shooting into the light. I would like to learn to manage Sun Stars, and flare for both color and B&W images. I find that I often like this effect in images. But, I really don't have a feel on how to to this in my images in an attractive way.
In today's image I made an attempt at this. Along the cliffs here in La Jolla the City has built a number of Gazebos for people to sit in and enjoy the views. This is an image of one of them....Show more →
Hi Steve,
I like this shot but agree with Allen that it is over exposed. Remember your sunny f/16 rule which is really easy in this image since you are shooting at f/16 and you are shooting into the sun. That means your SS should be 1/ISO or close to that for good exposure. That means you are about 3 stops over exposed according to the sunny f/16 rule of thumb and that looks about right here. I would have shot at ISO 200 with a 1/250 SS to protect the highlights, or course that give you more dynamic range and a better opportunity to pull up the shadows as well as you protect the highlights. As Allen suggests always protect the highlights with your Leica M10-P as it is easy to blow them, and you could easily pull up the shadows 3 or 4 stops on this image in post if you felt that was needed, or at least I think you could have especially in B & W.
I should probably also say that you don't need f/16 to get sunstars with a Voigtlander lens with 10 straight blades. You typically get nice sunstars starting at f/5.6 with these lenses. So, I probably would not have shot at f/16. I would have tried f/11 with a 1/500 shutter speed and f/8 with a 1/1000 shutter speed, but I would have kept ISO 200 to protect the highlights in either case.
Different lenses have good sunstars at different apertures. The Voigtlander lenses with 10 straight blades get them quite early, but some of the Leica lenses with curved blades do need smaller apertures. For example with my 21 SEM I would try f/11 if I was looking for sunstars, but might well need f/16. The 21 SEM has 9 curved blades with 18 point sunstars and with that aperture arrangement you need to stop down a lot further to get nice sunstars.
I hope some of this helps and isn't just repeating things you already know.
Mar 16, 2022 at 10:19 AM
p.17 #7Learning Leica "M", a 30 day project
I still like the image Steve. I would have shot at probably at f/11 and used live view and composed it so that just a little part of sun was showing which would have given a better defined sunstar. Which looks like it would be a few steps forward. Live view would also help in these situations to not overexpose.
Mar 16, 2022 at 10:29 AM
p.17 #8Learning Leica "M", a 30 day project
airfrogusmc wrote:
Steve, I do it but be careful of your highlights. With Leica M the shadows are there but the highlights are not so forgiving. The highlights are at least 2 stops to hot in this image you posted if you wanted to hold some detail. I would probably would have shot this at ISO 200 at f/16 at 250th or maybe 1/500 and pulled up the shadows.
I found a couple of examples I shot late last year. Not saying they are great shots but they do show how I handle highlights with Leica M digital. They are over in...Show more →
---------------------------------------------
Steve Spencer wrote:
One thing I want to work on is shooting into the light. I would like to learn to manage Sun Stars, and flare for both color and B&W images. I find that I often like this effect in images. But, I really don't have a feel on how to to this in my images in an attractive way.
In today's image I made an attempt at this. Along the cliffs here in La Jolla the City has built a number of Gazebos for people to sit in and enjoy the views. This is an image of one of them. I do like the graphic nature of this image, the story it tells, and the high contrast. I am happy with the composition and the focus.
I didn't want to darken the image so much that the shadows had no detail and it was basically just a silhouette with no texture in the wood and the rocks. I did manage that. However, this meant that I completely blew out good sized portions of the sky. How can I avoid that, or is that OK in such images? I stopped down the aperture to f/16 to get a Sun Star. I did manage to get a half decent one by positioning in on the edge of the gazebo. I would have prefered if it was more defined. The small aperture meant I had to have a high ISO of 2000 in order to keep the SS at my hand hold limit of 1/250 sec. I don't think noise is an issue because of this however.
I would love for those with experience in sh0oting into the light could post their tips and techniques for doing this. I am here to learn.
Enjoy the image.
Thanks,
-Steve-Hi Steve,
I like this shot but agree with Allen that it is over exposed. Remember your sunny f/16 rule which is really easy in this image since you are shooting at f/16 and you are shooting into the sun. That means your SS should be 1/ISO or close to that for good exposure. That means you are about 3 stops over exposed according to the sunny f/16 rule of thumb and that looks about right here. I would have shot at ISO 200 with a 1/250 SS to protect the highlights, or course that give you more dynamic range...Show more →
Thanks for the detailed responses guys. Yes, I recognized that it was way over exposed for the highlights. I will compensate even more in the future.
Keeping the ISO at 200 will definitely be useful in such situations as the dynamic range is best there and will assist in recovering shadows. There is no recovery for blown highlights.
I will also try keeping the aperture more open to see how the sunstars look with the CV lenses.
Once again, this thread is proving to meet its goals as a learning thread for me, and hopefully others. With that in mind, I find it is useful to post mistakes as well as successes.
My daytime default settings are now f/8, ISO 200, SS 1/500 sec, with infinity set above the f/8 for DOF. I can quickly adjust the minor differences I predict I will need so that when I bring the camera to my eye it is ready to compose and shoot. My hit rate is getting higher every day with this.
Thanks,
-Steve-
Edited on Mar 16, 2022 at 10:45 AM · View previous versions
Steve, I do it but be careful of your highlights. With Leica M the shadows are there but the highlights are not so forgiving. The highlights are at least 2 stops to hot in this image you posted if you wanted to hold some detail. I would probably would have shot this at ISO 200 at f/16 at 250th or maybe 1/500 and pulled up the shadows.
I found a couple of examples I shot late last year. Not saying they are great shots but they do show how I handle highlights with Leica M digital. They are over in...Show more →
---------------------------------------------
Steve Spencer wrote:
1bwana1 wrote
Day 24 Image:One thing I want to work on is shooting into the light. I would like to learn to manage Sun Stars, and flare for both color and B&W images. I find that I often like this effect in images. But, I really don't have a feel on how to to this in my images in an attractive way.
In today's image I made an attempt at this. Along the cliffs here in La Jolla the City has built a number of Gazebos for people to sit in and enjoy the views. This is an image of one of them. I do like the graphic nature of this image, the story it tells, and the high contrast. I am happy with the composition and the focus.
I didn't want to darken the image so much that the shadows had no detail and it was basically just a silhouette with no texture in the wood and the rocks. I did manage that. However, this meant that I completely blew out good sized portions of the sky. How can I avoid that, or is that OK in such images? I stopped down the aperture to f/16 to get a Sun Star. I did manage to get a half decent one by positioning in on the edge of the gazebo. I would have prefered if it was more defined. The small aperture meant I had to have a high ISO of 2000 in order to keep the SS at my hand hold limit of 1/250 sec. I don't think noise is an issue because of this however.
I would love for those with experience in sh0oting into the light could post their tips and techniques for doing this. I am here to learn.
Enjoy the image.
Thanks,
-Steve-
I like this shot but agree with Allen that it is over exposed. Remember your sunny f/16 rule which is really easy in this image since you are shooting at f/16 and you are shooting into the sun. That means your SS should be 1/ISO or close to that for good exposure. That means you are about 3 stops over exposed according to the sunny f/16 rule of thumb and that looks about right here. I would have shot at ISO 200 with a 1/250 SS to protect the highlights, or course that give you more dynamic range...Show more →
Thanks for the detailed responses guys. Yes, I recognized that it was way over exposed for the highlights. I will compensate even more in the future.
Keeping the ISO at 200 will definitely be useful in such situations as the dynamic range is best there and will assist in recovering shadows. There is no recovery for blown highlights.
I will also try keeping the aperture more open to see how the sunstars look with the CV lenses.
Once again, this thread is proving to meet its goals as a learning thread for me, and hopefully others. With that in mind, I find it is useful to post mistakes as well as successes.
My daytime default settings are now f/8, ISO 200, SS 1/500 sec, with infinity set above the f/8 for DOF. I can quickly adjust the minor differences I predict I will need so that when I bring the camera to my eye it is ready to compose and shoot. My hit rate is getting higher every day with this.
Thanks,
-Steve-
Edited on Mar 16, 2022 at 10:45 AM · View previous versions
Mar 16, 2022 at 10:35 AM
p.17 #9Learning Leica "M", a 30 day project
lifeandmylens wrote:
I still like the image Steve. I would have shot at probably at f/11 and used live view and composed it so that just a little part of sun was showing which would have given a better defined sunstar. Which looks like it would be a few steps forward. Live view would also help in these situations to not overexpose.
Thanks.
Yes, I am certain that Live View would have helped me do better with this shot. It is very much the same as my other mirrorless cameras. However, I am purposely trying to use the Range finder as much as possible during this learning program. It is what is new, and most challenging for me. I want to master it as much as possible.
I don't mind making and showing mistakes as long as I am learning from them.
-Steve-
I still like the image Steve. I would have shot at probably at f/11 and used live view and composed it so that just a little part of sun was showing which would have given a better defined sunstar. Which looks like it would be a few steps forward. Live view would also help in these situations to not overexpose.
Thanks.
Yes, I am certain that Live View would have helped me do better with this shot. It is very much the same as my other mirrorless cameras. However, I am purposely trying to use the Range finder as much as possible during this learning program. It is what is new, and most challenging for me. I want to master it as much as possible.
I don't mind making and showing mistakes as long as I am learning from them.
-Steve-
Mar 16, 2022 at 10:38 AM
p.17 #10Learning Leica "M", a 30 day project
1bwana1 wrote:
Thanks.
Yes, I am certain that Live View would have helped me do better with this shot. It is very much the same as my other mirrorless cameras. However, I am purposely trying to use the Range finder as much as possible during this learning program. It is what is new, and most challenging for me. I want to master it as much as possible.
I don't mind making and showing mistakes as long as I am learning from them.
-Steve-
Understood! Even turning live view on (and not using it) and using the range finder to shoot would help with metering.
lifeandmylens wrote
I still like the image Steve. I would have shot at probably at f/11 and used live view and composed it so that just a little part of sun was showing which would have given a better defined sunstar. Which looks like it would be a few steps forward. Live view would also help in these situations to not overexpose.Yes, I am certain that Live View would have helped me do better with this shot. It is very much the same as my other mirrorless cameras. However, I am purposely trying to use the Range finder as much as possible during this learning program. It is what is new, and most challenging for me. I want to master it as much as possible.
I don't mind making and showing mistakes as long as I am learning from them.
-Steve-
Understood! Even turning live view on (and not using it) and using the range finder to shoot would help with metering.
Mar 16, 2022 at 10:48 AM
p.17 #11Learning Leica "M", a 30 day project
One thing to remember sunny 16 is meant pretty much for sun at your back not shooting into it early am or late pm
Shooting into it early and late you will need to stop down at lest a couple more stops if you want to hold detail
Almost forgot the sun is probably going blowout and that’s ok. But other important detail should be ok.
Edited on Mar 16, 2022 at 02:50 PM · View previous versions
Shooting into it early and late you will need to stop down at lest a couple more stops if you want to hold detail
Almost forgot the sun is probably going blowout and that’s ok. But other important detail should be ok.
Edited on Mar 16, 2022 at 02:50 PM · View previous versions
Mar 16, 2022 at 01:43 PM
p.17 #12Learning Leica "M", a 30 day project
One thing I do is meter the sky about 25 degrees away from the sun making sure that the direct sun is not getting metered. A spot meter makes this really easy.
Mar 16, 2022 at 01:54 PM
p.17 #13Learning Leica "M", a 30 day project
Nothing wrong with blown highlights if they're deliberate. I would have shot this a stop lower as well. But that's me. You do what you want, if there's method behind the madness. Worst outcome is a shot you learn from. No one gets injured.... Also all films/sensors have limitations. It's important to learn where they are for your camera so you can exploit them.
This isn't film. If in doubt, bracket. Then you can experiment in post to see just how much you can push the shadows. If you don't get caught up in the nonsense debate about having no noise in an image, especially a Mono one like this there's a lot you can do with a curve in LR to get some lovely tonality. This image would be a really good one to spend some time with the curves and colour sliders to see how the sensor responds when it's close to the edge. Your futur success rate will improve with the knowledge shots like this give you.
I like the seagull.
Gordon
This isn't film. If in doubt, bracket. Then you can experiment in post to see just how much you can push the shadows. If you don't get caught up in the nonsense debate about having no noise in an image, especially a Mono one like this there's a lot you can do with a curve in LR to get some lovely tonality. This image would be a really good one to spend some time with the curves and colour sliders to see how the sensor responds when it's close to the edge. Your futur success rate will improve with the knowledge shots like this give you.
I like the seagull.
Gordon
Mar 16, 2022 at 02:59 PM
p.17 #14Learning Leica "M", a 30 day project
Yes agree Gordon some specular highlights can be good. Large areas that are completely blown are usually not so good.
Mar 16, 2022 at 03:57 PM
p.17 #15Learning Leica "M", a 30 day project
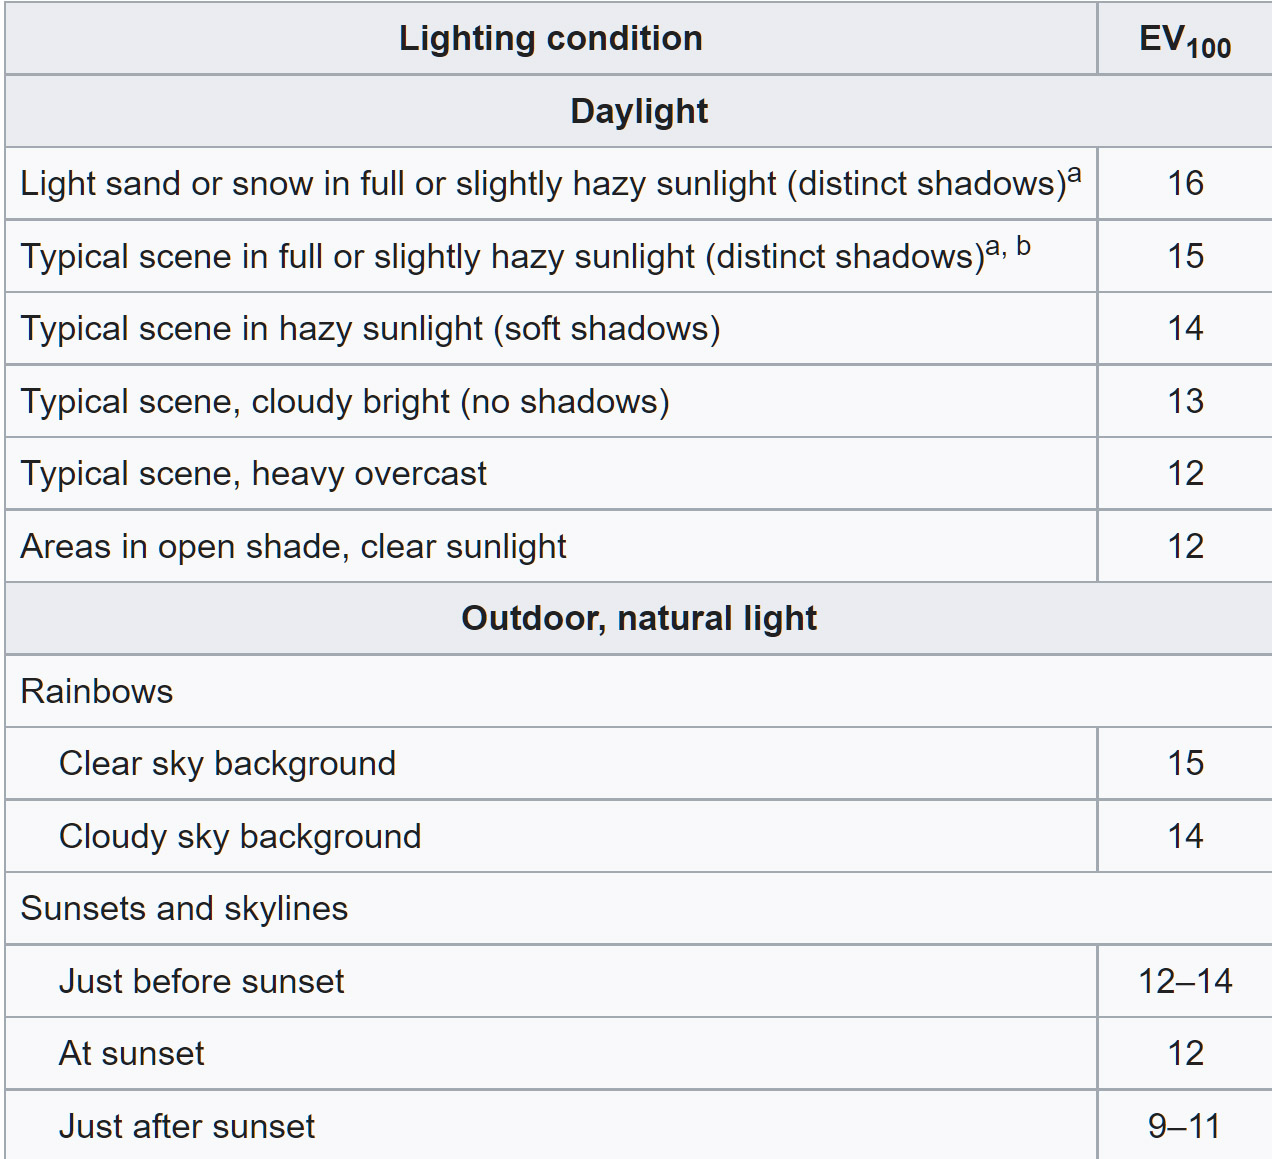
Sunny 16 (EV 15)
Shooting the sun, is shooting the light source ... not the same as Sunny 16
Subject illuminated by the direct sun during daylight hours = EV 15
Subject illuminated by the sky (i.e. not direct sun) during same is about EV 12 (3 stops less on shadow side)
So, you have to assess what it is you want to expose for ...
the sun itself (likely not)
the subject illuminated by the direct sun
the subject illuminated by the open sky (i.e. shadow side)
Bottom line is you can't have all three at the same time, but you can likely have the last two ... and lean your preference accordingly. Knowing that this is a three stop spread, I tend to lean on a -1 or -1.5 EC to protect my highlights for regular shooting, and then open up a couple or three stops when I swing into the shadows. This keeps me in a range of about 2 stops, so I've got wiggle room in post either for protection or for recovery.
Then, as you move away from daylight, into golden hour, your EV value of the direct sunlight drops to around EV 14 or EV 13 as time marches on toward sunset (sunrise).
The corresponding shadow side drops accordingly, by a similar 3 stops.
At sunset, the sunlight contribution is only around EV 12 (illuminating your subject).
If you notice, the daylight relationship of the shadow side (without direct sun) is 3 stops less than the key sunlit side. Then if you notice, the sunset is EV 12, 3 stops less than EV 15 ... the simple take away is that if you take away the direct sunlight contribution, and you're diff is 3 stops.
Armed with that, I can still use Sunny 16 and simply adjust my 3 EV for the shadow side. Shooting partial sun, adjust 1 or 2 EV depending on how "partial". I often just go with a 2 EV adjustment and call it close enough for the latitude in post.
So, if I'm shooting the shadow side (-3 EV) at sunset (-3 EV), then I'm probably going to be go about 4-5 EV adjustment from Sunny 16 values (compared to the combined 6 EV adjustment) ... again, staying in the wiggle room of about 2 EV, without too much risk.
https://en.wikipedia.org/wiki/Exposure_value#:~:text=In%20photography%2C%20exposure%20value%20(EV,for%20any%20fixed%20scene%20luminance).
To test this out for yourself, just meter the ground in front of you (illuminated by sun), then turn around 180 degrees and meter the ground (now) in front of you (now shadow side, illuminated by sky). Compare the values.
Not to be confused with the Zone System ... but, it's kind of a zone exposure approach, similar to zone focusing. Might not be perfectly exact, but it's quick and gets in range of where you want to be. That, and it is predicated on incident light values, not subject reflectance.
HTH

Shooting the sun, is shooting the light source ... not the same as Sunny 16
Subject illuminated by the direct sun during daylight hours = EV 15
Subject illuminated by the sky (i.e. not direct sun) during same is about EV 12 (3 stops less on shadow side)
So, you have to assess what it is you want to expose for ...
the sun itself (likely not)
the subject illuminated by the direct sun
the subject illuminated by the open sky (i.e. shadow side)
Bottom line is you can't have all three at the same time, but you can likely have the last two ... and lean your preference accordingly. Knowing that this is a three stop spread, I tend to lean on a -1 or -1.5 EC to protect my highlights for regular shooting, and then open up a couple or three stops when I swing into the shadows. This keeps me in a range of about 2 stops, so I've got wiggle room in post either for protection or for recovery.
Then, as you move away from daylight, into golden hour, your EV value of the direct sunlight drops to around EV 14 or EV 13 as time marches on toward sunset (sunrise).
The corresponding shadow side drops accordingly, by a similar 3 stops.
At sunset, the sunlight contribution is only around EV 12 (illuminating your subject).
If you notice, the daylight relationship of the shadow side (without direct sun) is 3 stops less than the key sunlit side. Then if you notice, the sunset is EV 12, 3 stops less than EV 15 ... the simple take away is that if you take away the direct sunlight contribution, and you're diff is 3 stops.
Armed with that, I can still use Sunny 16 and simply adjust my 3 EV for the shadow side. Shooting partial sun, adjust 1 or 2 EV depending on how "partial". I often just go with a 2 EV adjustment and call it close enough for the latitude in post.
So, if I'm shooting the shadow side (-3 EV) at sunset (-3 EV), then I'm probably going to be go about 4-5 EV adjustment from Sunny 16 values (compared to the combined 6 EV adjustment) ... again, staying in the wiggle room of about 2 EV, without too much risk.
https://en.wikipedia.org/wiki/Exposure_value#:~:text=In%20photography%2C%20exposure%20value%20(EV,for%20any%20fixed%20scene%20luminance).
To test this out for yourself, just meter the ground in front of you (illuminated by sun), then turn around 180 degrees and meter the ground (now) in front of you (now shadow side, illuminated by sky). Compare the values.
Not to be confused with the Zone System ... but, it's kind of a zone exposure approach, similar to zone focusing. Might not be perfectly exact, but it's quick and gets in range of where you want to be. That, and it is predicated on incident light values, not subject reflectance.
HTH
Mar 16, 2022 at 04:34 PM
p.17 #16Learning Leica "M", a 30 day project
Yes sunny 16 doesn't account for shooting into the sun and the sun reflecting off reflective surfaces such as water. pavement, etc. All of which are going to blow out if one doesn't account for the higher amount of luminance caused by direct reflection.
I usually meter 25/30 degrees away from the direct sun keeping the sun out of the meter pattern and start with that reading.
I don't shoot a lot of sunsets. Just usually not my thing. I tend to turn around to see what everyone isn't shooting. I usually find that more interesting. But when I do shoot a sunset I use the method I mentioned above. There is an example of that in a thread I just started Oldie Key West Sunset in City Street and Architecture forum for anyone interested. .
I usually meter 25/30 degrees away from the direct sun keeping the sun out of the meter pattern and start with that reading.
I don't shoot a lot of sunsets. Just usually not my thing. I tend to turn around to see what everyone isn't shooting. I usually find that more interesting. But when I do shoot a sunset I use the method I mentioned above. There is an example of that in a thread I just started Oldie Key West Sunset in City Street and Architecture forum for anyone interested. .
Mar 16, 2022 at 04:51 PM


p.17 #18Learning Leica "M", a 30 day project
RustyBug wrote:
Sunny 16 (EV 15)
Shooting the sun, is shooting the light source ... not the same as Sunny 16
Subject illuminated by the direct sun during daylight hours = EV 15
Subject illuminated by the sky (i.e. not direct sun) during same is about EV 12 (3 stops less on shadow side)
So, you have to assess what it is you want to expose for ...
the sun itself (likely not)
the subject illuminated by the direct sun
the subject illuminated by the open sky (i.e. shadow side)
Bottom line is you can't have all three at the same time, but you can likely have the last...Show more →
Thanks for the chart. I will print it, test it out and memorize it if it works.
Sunny 16 (EV 15)
Shooting the sun, is shooting the light source ... not the same as Sunny 16
Subject illuminated by the direct sun during daylight hours = EV 15
Subject illuminated by the sky (i.e. not direct sun) during same is about EV 12 (3 stops less on shadow side)
So, you have to assess what it is you want to expose for ...
the sun itself (likely not)
the subject illuminated by the direct sun
the subject illuminated by the open sky (i.e. shadow side)
Bottom line is you can't have all three at the same time, but you can likely have the last...Show more →
Thanks for the chart. I will print it, test it out and memorize it if it works.
Mar 16, 2022 at 07:34 PM
p.17 #19Learning Leica "M", a 30 day project
These charts used to come in the baoxes of Kodak film back in the day. They were specific to the ASA/ISO of the film though and not in EVs.
Many of the greats like Eisenstaedt and Winogrand never used meters. They would just go by those charts in the film boxes.
Many of the greats like Eisenstaedt and Winogrand never used meters. They would just go by those charts in the film boxes.
Mar 16, 2022 at 08:41 PM
p.17 #20Learning Leica "M", a 30 day project
Day 25 Image:
Some weeks ago (pre Leica M10-P project) my car needed to have its water pump replaced. As with everything these days it took time to get the parts. I needed to rent a car until repairs were completed. I had to go down to the ne rental car facility at San Diego Airport. This is a very nice contemporary style building. While there I noticed this amazing wall art installation and made a mental not to come back to photographic. I happened to need to drive right by the airport today, so stopped in to make an image of it.
To the naked eye, it looks like fairly normal lighting. But in camera terms it is quite low light. Interesting how well the human eye compensates for things like brightness, and color temperature. Cameras do not, and this presents some challenges.
I selected the Voigtlander 50mm f/1.5 Nokton II MC to shoot this image. There is actually a significant distance between the escalators and the wall. I wanted to compress that distance with the longer FL. However, I also needed to be reasonable close to the escalator in order to get the angle and composition I wanted. This meant that I had to shoot with an aperture of f/8 to get the needed DOF for the image. I lowered the SS to 1/125 sec to compensate. This is about the lower limit of had holding for me these days unfortunately. Gone are the day of 1/8 sec hand holding without IBIS. I do wish the Leica had IBIS to assist me with my issues. Anyway, all the above settings required me to set ISO to 6400. The image was still a bit dark, but capable with recovering detail in the shadows.
The shapes on the wall are actually automobile real light assemblies. They are very cool to see in person. I positioned myself at the top of the escalator and waited for a good subject. I shot a number of images with a variety of subjects that were uninteresting to me. Finally, this guy started up. He looked like a perfect subject because of his black outfit, and shaved head. The look he gave me at just the right time was great. I knew I has my shot. Sometimes we get lucky that way.
Once again I am conflicted between the impact the the bright read tails lights provide, and the strong graphic nature of a Black and White. I have decided to post the color version in this thread, and post the B&W version to the new Leica & ALT Monochrome Image thread here if you want to see it:
https://www.fredmiranda.com/forum/topic/1747501/2#15892734
The B&W does hold up to the high ISO better in my opinion.
Enjoy!
-Steve-
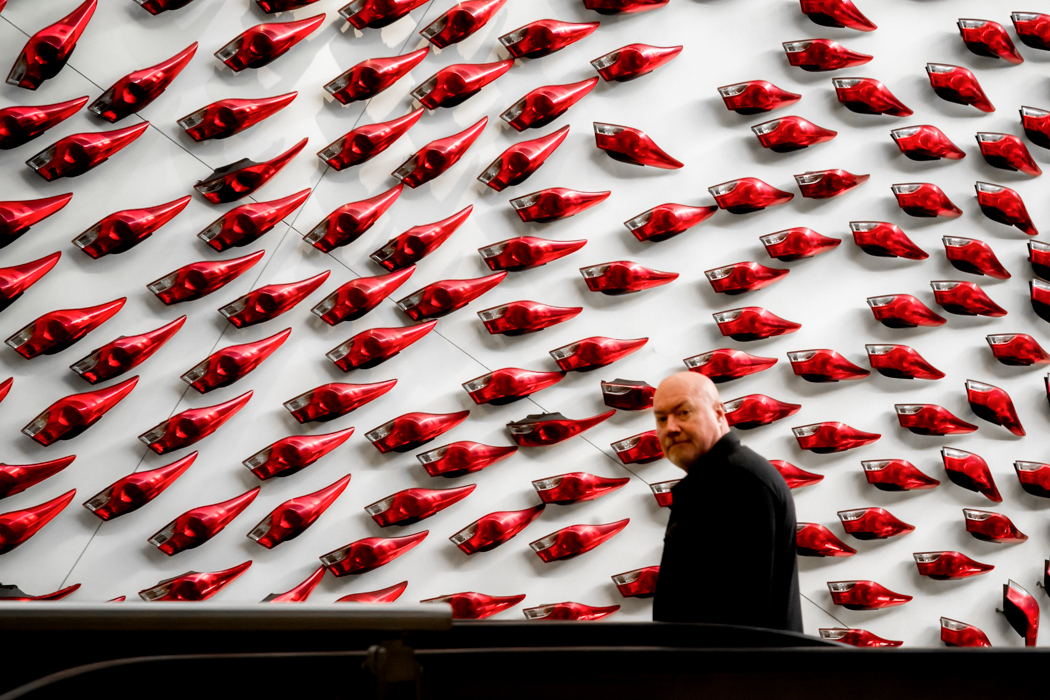
Leica M10-P, Voigtlander 50mm f/1.5 Nokton II MC, f/8, 1/125 sec, ISO 6400, Hand Held
Some weeks ago (pre Leica M10-P project) my car needed to have its water pump replaced. As with everything these days it took time to get the parts. I needed to rent a car until repairs were completed. I had to go down to the ne rental car facility at San Diego Airport. This is a very nice contemporary style building. While there I noticed this amazing wall art installation and made a mental not to come back to photographic. I happened to need to drive right by the airport today, so stopped in to make an image of it.
To the naked eye, it looks like fairly normal lighting. But in camera terms it is quite low light. Interesting how well the human eye compensates for things like brightness, and color temperature. Cameras do not, and this presents some challenges.
I selected the Voigtlander 50mm f/1.5 Nokton II MC to shoot this image. There is actually a significant distance between the escalators and the wall. I wanted to compress that distance with the longer FL. However, I also needed to be reasonable close to the escalator in order to get the angle and composition I wanted. This meant that I had to shoot with an aperture of f/8 to get the needed DOF for the image. I lowered the SS to 1/125 sec to compensate. This is about the lower limit of had holding for me these days unfortunately. Gone are the day of 1/8 sec hand holding without IBIS. I do wish the Leica had IBIS to assist me with my issues. Anyway, all the above settings required me to set ISO to 6400. The image was still a bit dark, but capable with recovering detail in the shadows.
The shapes on the wall are actually automobile real light assemblies. They are very cool to see in person. I positioned myself at the top of the escalator and waited for a good subject. I shot a number of images with a variety of subjects that were uninteresting to me. Finally, this guy started up. He looked like a perfect subject because of his black outfit, and shaved head. The look he gave me at just the right time was great. I knew I has my shot. Sometimes we get lucky that way.
Once again I am conflicted between the impact the the bright read tails lights provide, and the strong graphic nature of a Black and White. I have decided to post the color version in this thread, and post the B&W version to the new Leica & ALT Monochrome Image thread here if you want to see it:
https://www.fredmiranda.com/forum/topic/1747501/2#15892734
The B&W does hold up to the high ISO better in my opinion.
Enjoy!
-Steve-
Leica M10-P, Voigtlander 50mm f/1.5 Nokton II MC, f/8, 1/125 sec, ISO 6400, Hand Held
Mar 17, 2022 at 12:24 AM