fredmiranda.com
Login

Moderated by: Fred Miranda
Username  


FM Forums | Sony Forum | Join Upload & Sell

1              3       4       5       end
  

Sensor and lens tilt and how to DIY adjust your equipment


Fred Miranda
Offline
Admin
Upload & Sell: On
p.2 #1 · Sensor and lens tilt and how to DIY adjust your equipment


inksandpaper wrote:
Interesting, thanks. That was also how Joseph Holmes first suspected his camera to be crooked. You can't use a micrometer to measure sensor skew BTW. When you try many combinations, you can spot trends. Two bodies are not so good for a deterministic judgement, three increases the probability you're right by quite a bit.

For what it's worth, my Voigtlander 65mm A-L performs identically on my a7R II and then-new a7R IV (no longer with me), but the a7R IV was actually crooked by about 30 microns. The bayonet machining differences accounted for that. I was very surprised to discover this,
...Show more →

Thank you. When I say well centered, I mean the image field is equal at all areas of the frame, not just the corners. I've encountered many fast lenses (f/1.2, f/1.4 or even f/1.8) with perfect symmetry at the extreme corners but asymmetric at the mid-zone and in some cases even outside the center area. (The CV 40/1.2 is famous for that)
Field curvature is always taken out of the equation.

I will try your process with a tilted lens I have right now. Thanks for the link and great information here.

I wanted to place an order here: https://us.misumi-ec.com/vona2/detail/110302677870/?KWSearch=shim%20ring&searchFlow=results2products

What's your suggestion for what to order to cover lens tilt issues?

How many and what combinations of CIMRS2-4-0.xx...should I get to start?
Best,
Fred


Sep 06, 2020 at 10:11 PM
inksandpaper
Offline
•
Upload & Sell: Off
p.2 #2 · Sensor and lens tilt and how to DIY adjust your equipment


Fred Miranda wrote:
Thank you. When I say well centered, I mean the image field is equal at all areas of the frame, not just the corners. I've encountered many fast lenses (f/1.2, f/1.4 or even f/1.8) with perfect symmetry at the extreme corners but asymmetric at the mid-zone and in some cases even outside the center area. (The CV 40/1.2 is famous for that)
Field curvature is always taken out of the equation.

I will try your process with a tilted lens I have right now. Thanks for the link and great information here.

Best,
Fred


Thanks for the clarification, and you're most welcome! Thanks also for sharing so much with us so freely. Your lens tests for many E-mount lenses have been very helpful over the years.

Radially symmetrical, got it. That's what I'm thinking too. The optical messes of lenses, especially very wide aperture ones, can be quite weird indeed.

I wanted to place an order here: https://us.misumi-ec.com/vona2/detail/110302677870/?KWSearch=shim%20ring&searchFlow=results2products

What's your suggestion for what to order to cover lens tilt issues?


I typically use the 2mm ID and 4mm OD shims, but this depends on the available space inside the lens and screw shaft diameter.

I would first attempt to evaluate the lens tilt before shopping for shims so you have an idea of what you might need. It's hard to give specific suggestions because the lens could be a little bit tilted or a lot. It might be both tilted and swung, so you would have to shim at three screw positions rather than two, assuming the screw positions are like what you will find on the Voigtlander E-mount lenses. Canon EF lenses have offset/non-orthogonal-to-the-sensor screw positions which makes them more complicated to shim.

You can order any of the shims individually, it's not necessary to buy in packs of 30. At the moment, I have several each of 10, 20, 30, 50, 100 and 200-micron shims on hand. To make 40 microns, I like to combine 20+20 rather than 30+10. Similarly to make 60 microns, 30+30 is preferred over 50+10. The 10-micron shims are most fiddly.


Sep 06, 2020 at 11:35 PM
Fred Miranda
Offline
Admin
Upload & Sell: On
p.2 #3 · Sensor and lens tilt and how to DIY adjust your equipment


inksandpaper wrote:
Thanks for the clarification, and you're most welcome! Thanks also for sharing so much with us so freely. Your lens tests for many E-mount lenses have been very helpful over the years.

Radially symmetrical, got it. That's what I'm thinking too. The optical messes of lenses, especially very wide aperture ones, can be quite weird indeed.

I typically use the 2mm ID and 4mm OD shims, but this depends on the available space inside the lens and screw shaft diameter.

I would first attempt to evaluate the lens tilt before shopping for shims so you have an idea of what you might need.
...Show more →

Thank you!

On your article you wrote: "‘0.xx’ refers to the thickness in mm. We typically want to have 0.01, 0.02, 0.03, 0.50 and 0.10 on hand."

Did you mean to write: 0.05 instead of 0.50?


Sep 07, 2020 at 01:34 PM
inksandpaper
Offline
•
Upload & Sell: Off
p.2 #4 · Sensor and lens tilt and how to DIY adjust your equipment


Fred Miranda wrote:
Thank you!

On your article you wrote: "‘0.xx’ refers to the thickness in mm. We typically want to have 0.01, 0.02, 0.03, 0.50 and 0.10 on hand."

Did you mean to write: 0.05 instead of 0.50?


Great catch, thanks! Yes, it should be 0.05, how embarrassing. Sorry for the confusion; I've just amended the article.


Sep 07, 2020 at 05:32 PM
Fred Miranda
Offline
Admin
Upload & Sell: On
p.2 #5 · Sensor and lens tilt and how to DIY adjust your equipment


inksandpaper wrote:
Great catch, thanks! Yes, it should be 0.05, how embarrassing. Sorry for the confusion; I've just amended the article.


Just a typo. I've ordered some shims and should get it soon.


Sep 07, 2020 at 06:59 PM
inksandpaper
Offline
•
Upload & Sell: Off
p.2 #6 · Sensor and lens tilt and how to DIY adjust your equipment


Fred Miranda wrote:
Just a typo. I've ordered some shims and should get it soon.

Great! Please update us on your progress :-) hope it goes very well. Would it be ok to mention which lens you are trying to adjust?


Sep 07, 2020 at 08:00 PM
Jochenb
Offline
• • • •
Upload & Sell: Off
p.2 #7 · Sensor and lens tilt and how to DIY adjust your equipment


A few years ago I successfully adjusted an FE 35/1.4 ZA using aluminium foil and after a big streak of tilted/decentered lenses I started thinking about looking into this again.
So thank you for this very interesting thread!
Those shims look more convenient than aluminium foil.


Sep 09, 2020 at 08:23 AM
Jman13
Online
• • • • • •
Upload & Sell: On
p.2 #8 · Sensor and lens tilt and how to DIY adjust your equipment


I'm impressed by the level of detail, the work and the chasing of perfection....

but....

I can't imagine caring this much about minute differences in sharpness that you need to zoom in 200% to see clearly. These improvements will almost never be seen in a print - you'd have to print huge, then compare two images side by side to even notice it. The amount of times I need to shoot something perfectly flat at a wide aperture where the depth of field would not cover the differences are so incredibly rare as to be essentially unimportant. You mention Astrophotography as such a thing, but the motion of the earth under the stars is going to impart more movement to the stars than would be apparent from such an undertaking.

Such a process may make sense for an individual prime lens with rather severe focus tilt, but outside of that this just seems to be a tremendous amount of work for very minute improvements.

You may have mentioned it in the article, but I only had time to skim and look at the images....how do you determine in the first place whether the lens or the camera is where the tilt is? You're using older 645 lenses as your baseline, but how are you certain that they are straight, and the camera is off?

Edited on Sep 09, 2020 at 08:46 AM · View previous versions


Sep 09, 2020 at 08:40 AM
Jochenb
Offline
• • • •
Upload & Sell: Off
p.2 #9 · Sensor and lens tilt and how to DIY adjust your equipment


Jman13 wrote:
I'm impressed by the level of detail, the work and the chasing of perfection....

but....

I can't imagine caring this much about minute differences in sharpness that you need to zoom in 200% to see clearly. These improvements will almost never be seen in a print - you'd have to print huge, then compare two images side by side to even notice it. The amount of times I need to shoot something perfectly flat at a wide aperture where the depth of field would not cover the differences are so incredibly rare as to be essentially unimportant. You mention Astrophotography as such
...Show more →

I agree.
That's why I only cared trying it with my FE 35/1.4 in the past, because that one had a clearly visible tilted focus plane.


Sep 09, 2020 at 08:45 AM
inksandpaper
Offline
•
Upload & Sell: Off
p.2 #10 · Sensor and lens tilt and how to DIY adjust your equipment


Jman13 wrote:
I can't imagine caring this much about minute differences in sharpness that you need to zoom in 200% to see clearly. These improvements will almost never be seen in a print - you'd have to print huge, then compare two images side by side to even notice it. The amount of times I need to shoot something perfectly flat at a wide aperture where the depth of field would not cover the differences are so incredibly rare as to be essentially unimportant.


The issues I've encountered are all easily noticeable to me at 100% zoom, sometimes 50% zoom. Several of the worst problems are easily noticeable at Instagram sizes, for what it's worth. I can see these problems in a print without side-by-side comparison. It is important to me, just as it is unimportant to you. As I mentioned in my TLDR opening, this is not for everyone, and it's perfectly fine if one does not care about such quality differences or is naturally unable to appreciate them visually.

Then, if one starts to care to the point of wanting to make a DIY adjustment, it is also natural to want to make a precise adjustment. If the job's worth doing, it's worth doing well, as they say.

You mention Astrophotography as such a thing, but the motion of the earth under the stars is going to impart more movement to the stars than would be apparent from such an undertaking.

Since you said you saw the pictures, I assume you noticed that the Earth's rotation was not affecting my exposures for the stars, evidenced in the close-up crop of the Cherry Tree image. The stars are extremely sharp and round with no trailing, I was using a tracker, so this is a moot point.

Such a process may make sense for an individual prime lens with rather severe focus tilt, but outside of that this just seems to be a tremendous amount of work for very minute improvements.

The worst field tilts I've seen are typically in zoom lenses, and so they benefit most from such correction assuming they are centered to begin with and thus worth saving. Again, minute to one person may be quite visible and irritating to another. The 40-70 micron or more tilts I've seen in my sharpest primes are not insignificant at all to me. Many of Fred's lens comparisons, like most recently where he showed the GM12-24 vs Sigma 14-24, are much more subtle than the tilting issues I've experienced. I don't see anyone complaining about that.


You may have mentioned it in the article, but I only had time to skim and look at the images....how do you determine in the first place whether the lens or the camera is where the tilt is? You're using older 645 lenses as your baseline, but how are you certain that they are straight, and the camera is off?


That's because the lens is not used to determine the error of the camera. We flip the camera relative to the lens. What lenses we choose to use is entirely irrelevant and they can be totally crooked and have zero bearing on the evaluation. All the information is detailed in the article.


Sep 09, 2020 at 11:53 PM


Search in Used Dept. 

Beni
Offline
• • • • • •
Upload & Sell: Off
p.2 #11 · Sensor and lens tilt and how to DIY adjust your equipment


I do wonder whether they might be room for a niche service doing the testing and adjustment and providing fully tuned camera/lens combinations for a discerning customer.


Sep 10, 2020 at 03:49 AM
realVivek
Offline
• • • •
Upload & Sell: Off
p.2 #12 · Sensor and lens tilt and how to DIY adjust your equipment


Yes. Sony provides that in a RX1/ RX1R II.

Beni wrote:
I do wonder whether they might be room for a niche service doing the testing and adjustment and providing fully tuned camera/lens combinations for a discerning customer.


Sep 10, 2020 at 05:21 AM
inksandpaper
Offline
•
Upload & Sell: Off
p.2 #13 · Sensor and lens tilt and how to DIY adjust your equipment


Beni wrote:
I do wonder whether they might be room for a niche service doing the testing and adjustment and providing fully tuned camera/lens combinations for a discerning customer.


I've discussed just such a thing with Ilija at Kolari Vision. A few ideas were floated but mainly we wonder if there is a market for such a service (hardly anyone is aware of, let alone complains about this issue), and how much would people be willing to pay for it. It's not a quick job to adjust the camera. Several hours of work at a minimum, but more likely several days total is needed by the method I proposed. I once asked Roger Cicala how much it would cost to measure my lens on OLAF and have them optically adjust it to as perfect as possible, and it was something like over $5000 for a prime, possibly around $10,000 for a zoom. Don't quote me on that, but I seem to recall it was several times the cost of a typical 24-70 2.8 or 70-200 2.8. It should be possible to go digging for that old comment on Disqus.

Edit: Fred Miranda has tried and the bayonet can be removed normally just like the older 4-screw mounts. Please ignore the below.

I've also just learned that all the new Sony cameras with 6-screw bayonets from the a7R III onwards have different shaped front mounts which are not easily removed, and the design most likely prevents shimming because of the way the front panel clamps down on the mount. So those would require full disassembly to reach the sensor and shim there. Just the disassembly and re-assembly can take over an hour each, as compared to 10 minutes with the removable 4-screw mount on the a7/a7R/a7R II/a7 II/a7S/a7S II. It might take anywhere from 3-5 rounds of iterative adjustments to arrive at the optimal position. If there are enough requests, it might make it worthwhile to invest in the confocal setup which automates the measurement of the sensor tilt, so only one measurement is needed, and one adjustment is needed. No more manual visual evaluation needed. It still won't be a cheap service.

I wonder also about the need to adjust the camera, given the bayonet machining issue and that camera tilts are generally small. Maybe the best bet is to select a camera that is quite straight, never adjust the camera and simply shim all of one's lenses to that camera. When you switch cameras, re-shim any lenses that mate differently with the new one. And you don't need to re-shim every lens if you are mostly doing stopped-down landscape photography. Only the special primes for special work, for example. This was actually my plan when I got an a7R IV for a trip that never happened due to the pandemic, before I knew the mount was non-removable.

Edited on Sep 13, 2020 at 09:00 PM · View previous versions


Sep 10, 2020 at 05:53 AM
Fred Miranda
Offline
Admin
Upload & Sell: On
p.2 #14 · Sensor and lens tilt and how to DIY adjust your equipment


Samuel @inksandpaper,

I have a Minolta 200/2.8 that needs adjustment in two screw areas. How many millimeters would you guess this asymmetry seems to be? 0.1, 0.2, 0.3, 0.4mm, etc.?

Also, is it right to think that the softer corner is the one that require the shim(s)?

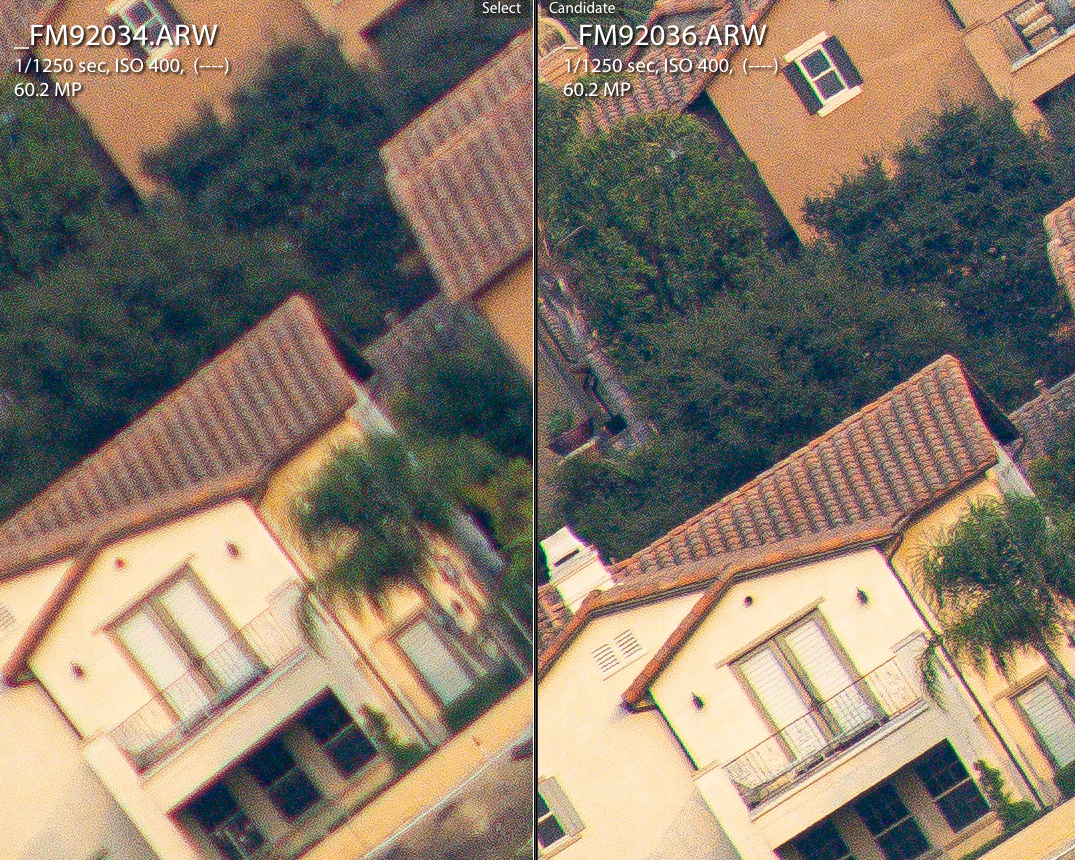
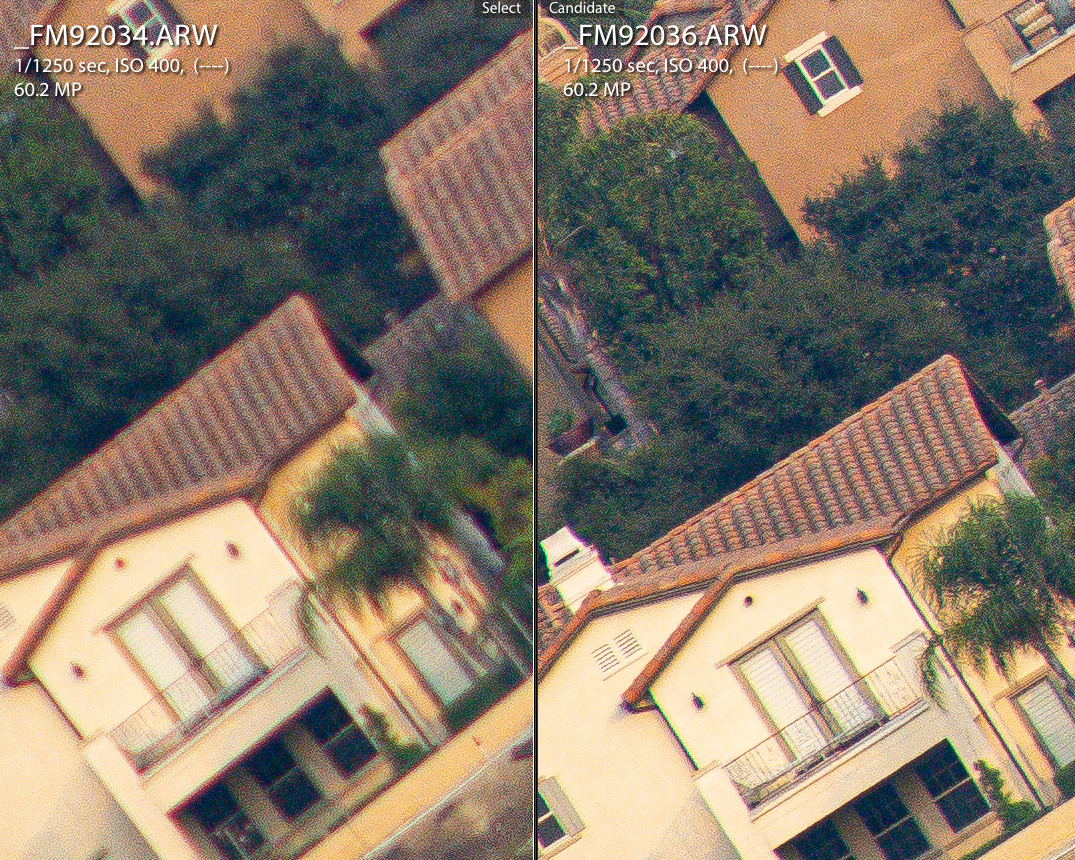
This is they worse side (bottom left) for this specific lens:


Sep 11, 2020 at 08:39 PM
inksandpaper
Offline
•
Upload & Sell: Off
p.2 #15 · Sensor and lens tilt and how to DIY adjust your equipment


Fred Miranda wrote:
Samuel @inksandpaper@,
Perhaps I missed this information somewhere but where did you get the the paper rolls to hold the shims in place securely?


Hi Fred, I made them myself, cut from a sheet of regular 80gsm/20lb laser paper. About 1-1.5" long, 3/8/" wide. Rolled along the short edge. It might help to start with 1/2" wide and then trim down to get a perfect it. The roll has to be very tight, it's a little tricky to form a good leading edge curl for the roll, takes a few tries. It's hard with dry finger skin. You might find it helpful to use a thin rod to assist you in forming the leading edge curl rather than doing that freehand. I save them afterwards for future lenses so I don't have to keep making new ones. Alternatively, you can use a thick plastic bristle from a brush, or the wire of a paper clip.

I have a Minolta 200/2.8 that needs adjustment in two screw areas. How many millimeters would you guess this asymmetry seems to be? 0.1, 0.2, 0.3, 0.4mm, etc.?

Also, is it right to think that the softer corner is the one that require shim(s)?

This is they worse side (bottom left) for this specific lens:


There is no way for anyone to tell from these two crops. But that's certainly not 1000 microns (1mm) of skew, let alone 4000 microns worth. We need to be able to see the focus plane. You first need to establish if the lens is decentered or if there is focus plane skew. One way to tell is if you refocus on the bottom left corner, does it come into focus? If it never does, it is likely due to decentering and shimming isn't going to help. You're in luck if refocusing there allows it to come into good focus as expected for the corner of that lens. If there is continuous detail near to far, you should also look for the plane of focus and observe how it bends from edge to edge of the frame. Is it nearer on the left side or the right side? We need to observe the entire frame for that, you can't see it by looking at a tiny portion of the corners only.

Also, don't hold the camera at an angle like this. I don't know what angle the camera is at. You need to break down the focus plane skew into tilt (vertical direction) and swing (horizontal direction). The skew can be in any direction of 360 degrees (in reference to the face of the mount) and there's no way to easily tell that when the camera is rotated like this. Rather, do your test shoot with the camera level, for horizontal and then vertical orientation. Put the plane of focus through the centre of the frame, so it goes from center left edge to center right edge, like what you see in my running track test example. Then you can see the swing and the tilt of the lens clearly. The sum of the two will give you the actual skew of the focus plane and angular direction. But you don't need to know the latter usually, because you shim the lens mount screws in pairs, I'm assuming their position on your lens is orientated in the shape of a square. If the lens is swung, you shim only the top left and bottom left screw, or only the top right and bottom right screw. You do them in pairs, putting the same shim thickness under each adjacent pair of screws. You don't ever want to leave one part of the mount unsupported and thus cause it to bend and warp when the screws are tightened. Shim in pairs, always. If it is tilted, you shim in pairs again, top right and left, or bottom right and left screws. If the lens is both tilted and swung, you still shim in pairs again, three screws in total are affected. E.g. top two screws and both left side screws - so the top left screw position gets the combined tilt+swing shim thickness applied. This way you don't have to worry about computing the skew orientation if it is not orthogonal to the sensor.

You also need to know how far everything is from you in the scene. How far is that building from you in feet/miles? What about the building behind it? And the tree in front of the house? What object is in focus on the left edge, what distance is that to the camera? What object is in focus on the right edge, how far away is that from the camera? Then you use the formula to compute focus distance to extension at the sensor plane for each side for camera horizontal and vertical orientation. The difference is the amount of swing and tilt that is present. Can't guess by just looking at these two crops without knowing the focus distance.

https://www.dyxum.com/lenses/Minolta-AF-200mm-F2.8-G-APO-HS_lens78.html


Yikes, if this is the lens you are trying to shim, the mount screw positions don't look orthogonal to the sensor, using the focus distance display and red dot bayonet mating marker as a reference point for the orientation of the lens. I'm not sure. I don't have this lens. It might be slightly offset only, and maybe you can get away by assuming it isn't. Plus a little trial and error is usually needed to get to the optimum adjustment anyway, which would negate this issue somewhat.


Sep 12, 2020 at 11:47 AM
Fred Miranda
Offline
Admin
Upload & Sell: On
p.2 #16 · Sensor and lens tilt and how to DIY adjust your equipment


inksandpaper wrote:
Hi Fred, I made them myself, cut from a sheet of regular 80gsm/20lb laser paper. About 1-1.5" long, 3/8/" wide. Rolled along the short edge. It might help to start with 1/2" wide and then trim down to get a perfect it. The roll has to be very tight, it's a little tricky to form a good leading edge curl for the roll, takes a few tries. It's hard with dry finger skin. You might find it helpful to use a thin rod to assist you in forming the leading edge curl rather than doing that freehand. I save them
...Show more →

Thanks for the info Samuel. The subject is at infinity distance where I don't think precise camera parallelism is needed. I can repeat this test multiple times and it always show the same exact results.

I was able to find this instead of using paper rolls: (hoping it will work ok)

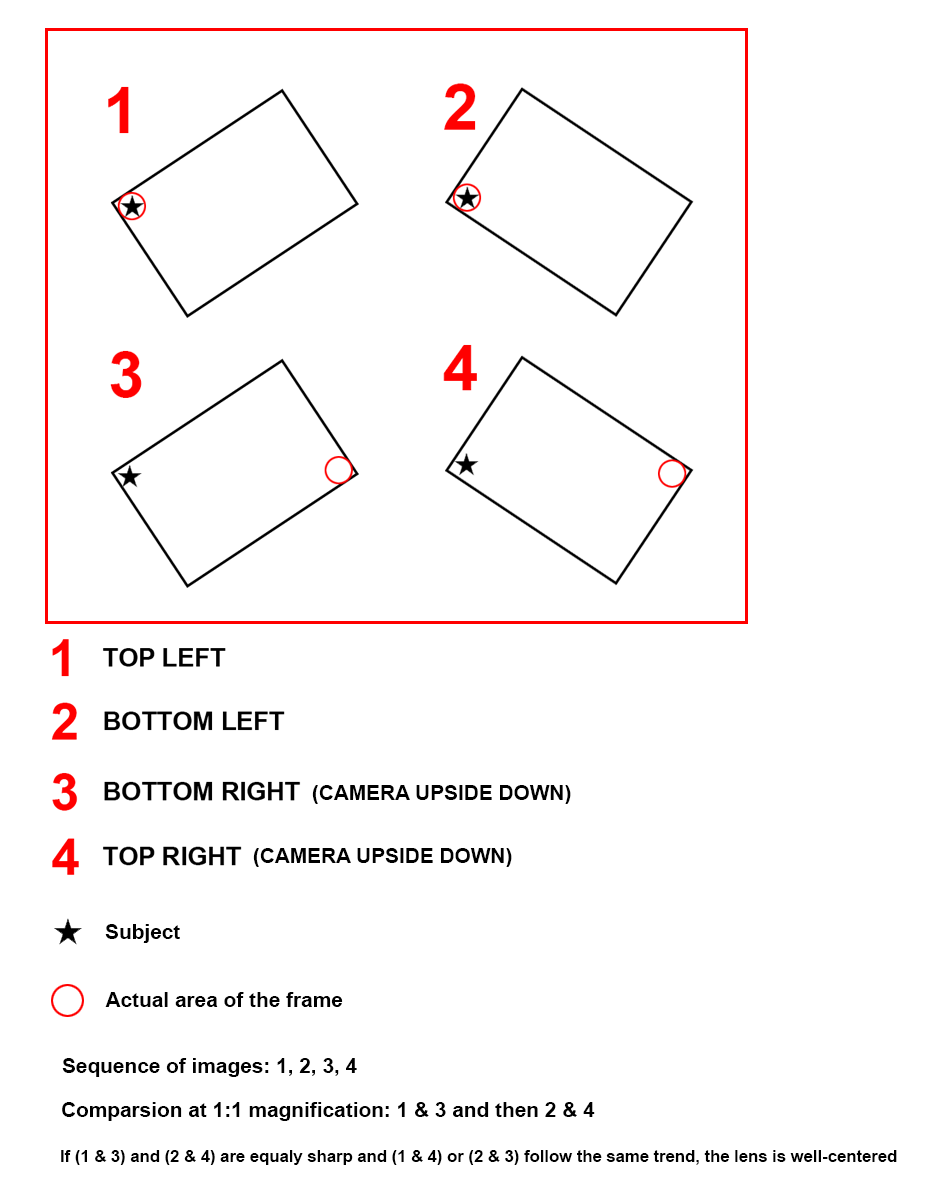
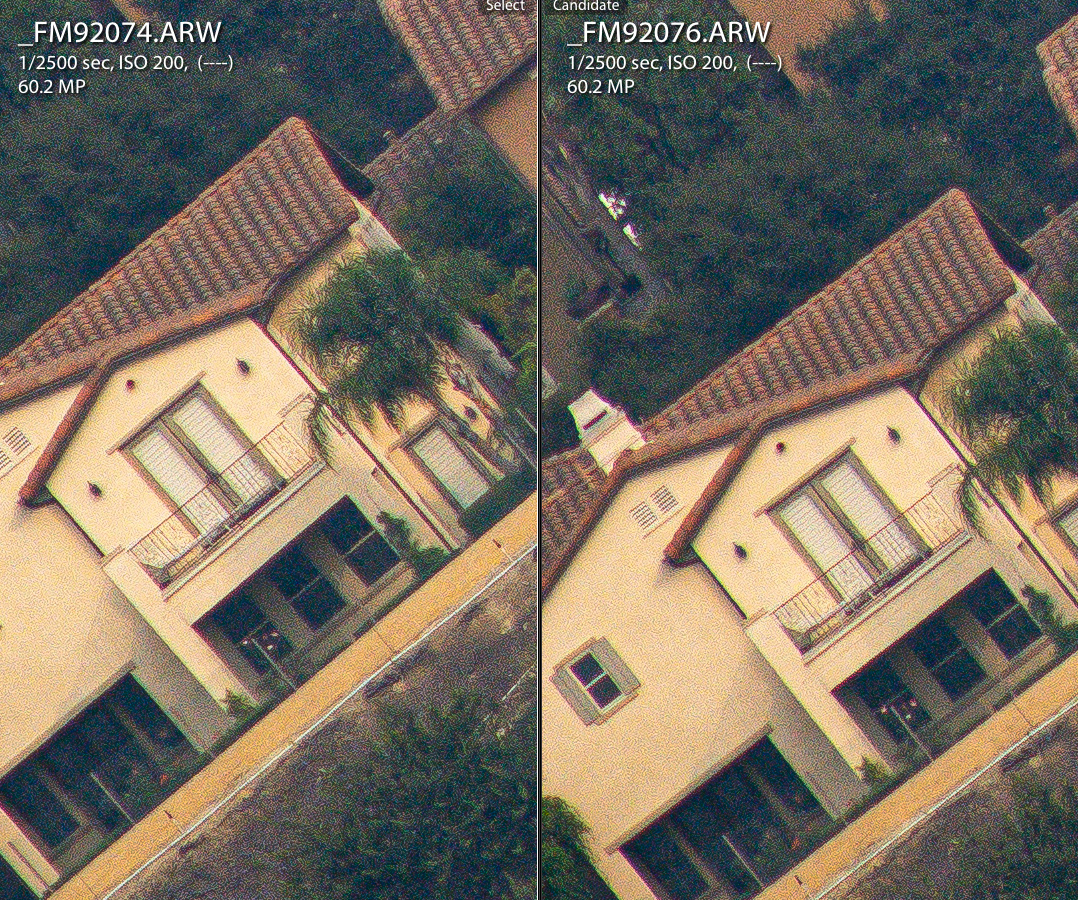
The lens seems to have a focal plane swing. The corners are equal when focusing on them individually. Only when focusing at center, I see the discrepancy towards the left side.

I'm not sure how severe the swing is since the adapter is another variable. I will measure the adapter pararelism using a micrometer today and try another two to see if the results are consistent before attempting to tweak the focal plane.

It looks like the swing is at "1" and "2" areas on this illustration (Or left/right side of the frame):


The number "2" area is more severe compared to "1" (I'm guessing by about 5 times)

I will wait for a couple more adapters to confirm if this is the case.


Sep 12, 2020 at 12:34 PM
Fred Miranda
Offline
Admin
Upload & Sell: On
p.2 #17 · Sensor and lens tilt and how to DIY adjust your equipment


Update: I've measured my Minolta to E-mount adapter for parallelism using a micrometer and all sides are equal.
So, I decided to do some lens tweaking since I know my A7R IV's mount to sensor is parallel as well.

Based on the image I posted above:

For "1" I added 0.02 (20 micron) to the screw corresponding to that location and for "2" I added 0.10 (5 times more).
PS: I did this before reading your previous post. (to always do in pairs)

The result is that "1" is now symmetric to "3" (before it was hair off) and "2" improved tremendously and it's now only a tad off compared to "4". I would consider this lens well centered where before it was not.

I'm thinking about adding an extra 0.02mm to "2" (for a total of 0.10+0.02 or 120 micron) to see if things improve even further.


Sep 12, 2020 at 02:04 PM
Fred Miranda
Offline
Admin
Upload & Sell: On
p.2 #18 · Sensor and lens tilt and how to DIY adjust your equipment


So, I added the extra 0.02 shim (20 micron) on corner "2" and here is how it looks now. Very symmetric considering this was tested on the A7R IV.


Corner 2 and 4 (AFTER SHIM TWEAK)


Corner 2 and 4 (BEFORE SHIM TWEAK)


Sep 12, 2020 at 07:18 PM
Fred Miranda
Offline
Admin
Upload & Sell: On
p.2 #19 · Sensor and lens tilt and how to DIY adjust your equipment


So, after reading your article again, I realized that both tilt or swing must be corrected in pairs (same shim thickness amount). If it's tilted and swung, the shims go on three screws. (both top and both left for example so the top left gets a thicker shim amount)
I will try this method with another lens but this one (Minolta 200/2.8) became well centered with what I did.


Sep 12, 2020 at 08:01 PM
Fred Miranda
Offline
Admin
Upload & Sell: On
p.2 #20 · Sensor and lens tilt and how to DIY adjust your equipment


BTW: For those who want to test the camera mount/sensor parallelism (as posted by Samuel on his article), there is a Kipon shift adapter (EF to E) that has a tripod mount and rotates 360 degrees. This is an alternative to the Mirex since it's discontinued:

https://www.ebay.com/itm/Kipon-Shift-15mm-Adapter-for-Canon-EOS-EF-Lens-to-Sony-E-Mount-Camera-NEX-360/124024665751


Sep 12, 2020 at 11:10 PM
1              3       4       5       end


FM Forums | Sony Forum | Join Upload & Sell

1              3       4       5       end


You are not logged in. Login or Register