The traditional approach to portrait lighting ratios such as 3:1 is focused primarily on the appearance of the shadows on the face. As the ratio changes from 2:1 to 3:1 and greater exposure is typically adjusted to keep the highlights the same and the change seen in the photos is the shadows getting darker.
It\'s not apparent but the ratio convention used for portraits isn\'t f/stops or incident differences. A 2:1 ratio is means 2x more light (1/stop brighter) light is reflecting off the face in the shadows for every 1 unit reflecting from the highlight. The lowest integer ratio under the convention is a 2:1 ratio created by overlapping equal incident strength off axis \"key\" over centered fill:
H:S
1:1 Fill even on entire face
1:0 Key light overlaps creating highlights
===
2:1 Highlights reflect 2x more light.
There\'s no rule that says fill must be centered, but look what happens with equal key and fill are placed on opposite sides:
H:S
1:0 Fill on left
0:1 Key on right
==
1:1 The net effect is mostly flat lighting with unfilled shadows where neither light reaches. It\'s the same incident ratio where the light hit but the direction of the fill changes the results.
It is also possible to get a 2:1 ratio like this with crossed key and fill:
H:S
2:0 Key
0:1 Fill
==
2:1 But the results will look different than centered fill because the fill falls off sideways vs front>back on the face and the ratio will be different and lighter on the side closer to the fill source and darker on the side opposite. Also where key and fill shadow cross each other or don\'t reach there is no fill and very dark shadows.
YMMV, but I prefer the appearance of centered chin level fill for portraits because it creates very few visible shadows on a face eliminating unfilled voids. While it might seem the fill light is \"flat\" because it creates no sideways modeling clues the front>back fall off on a face creates an exposure gradient in the shadows which makes the closer nose shadow lighter in tone than sides of the face and ears.
Making the shadows the constant in the highlight:1 notation may be because the very first ratio meters consisted of a card with two holes held in front of one eye to judge the ratio. One hole was clear and held over the shadow side. The other hole had gradient of neutral density on a strip or wheel. The ND filters where moved until the appearance of both sides matched. The density reading of the ND filter reveals how much brighter the highlight side is by comparison: .30 = 2x, .45 = 3x, .60 = 4x, etc. So with that primitive meter if you wanted a 3:1 ratio you\'d move a .45 filter over the highlight side and adjust key light until the two sides matched. It\'s still a very accurate way to judge ratios visually.
A digital sensor has a fixed range that varies with sensor size and other design factors. You can determine your camera range with a gray card and fast lens. Open the lens as wide as possible and adjust shutter slower until the gray card reproduced is just below clipping with eyedropper = 250. Then close down the lens (and adjust shutter faster in full stop increments) until the card is reproduced at around 30 units, the threshold where detail above 0 black can be seen in an image. The difference in stops it takes to reproduce the card 250 and 30 eye dropper units is the practical range of the camera and typically between 6 and 8 f/stops of visible highlight:shadow detail.
If your FF camera has a range of 8 stop and my crop camera has a range of 6 stops will the same lighting ratio produce the same results? No.
I first realized that myself when ugrading cameras and seeing the shadow detail change when I exposed the highlights the same using the same ratios. I was setting ratios via identical power on identical key and fill flashes via distance so only variable that could explain the change in shadow detail I saw was the difference in range of the cameras. It made me realize the ratio I really needed as a baseline for \"normal\" looking results in photos wasn\'t 3:1 or 2:1 but the one which would reproduce a full range of tone in the subject on the camera sensor range I was using.
Something I realized since the early days learning the Zone System and making halftones in the National Geographic photo lab is that when the shadows and highlights are reproduced accurately, per what you\'d expect to see by eye in the same context, all the tones in between the ends of a gray scale line up like ducks in a row in a linear progression. That\'s to say if the ducks ranged in even .30 reflective densities from black > grays > white by eye they\'d wind up looking similarly linear in the photo, automatically. That\'s because the process on film/print paper and digital is engineered to work that way.
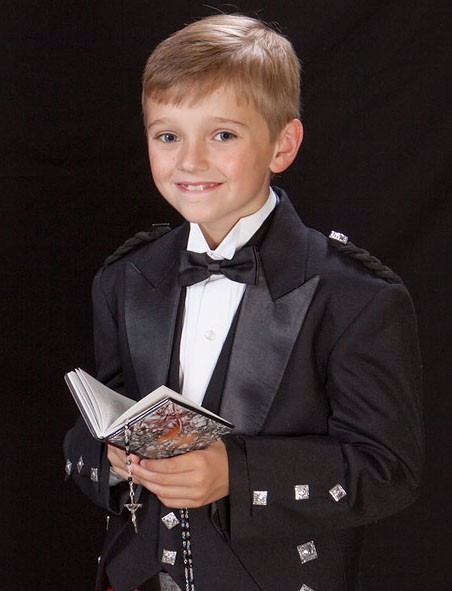
What is the lighting ratio in that shot above numerically? Between 2:1 where key= fill incident strength and 3:1 where key is a stop higher than fill if measured with an incident meter.
What happens if more or less fill is used from that \"fit the sensor\" ratio baseline? Since I only had lighting that matched the sensor range for that shot I\'ve simulated the over / under fill with Photoshop.
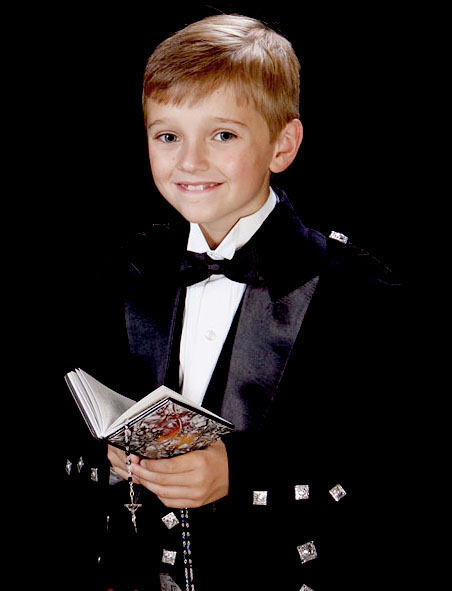
If fill was reduced to make the shadows on the face darker and the key intensity raised so the highlights in the white shirt are exposed the same at the same f/stop the overall scene range will exceed the sensor\'s and both detail in the black suit and separation with the background would be lost...
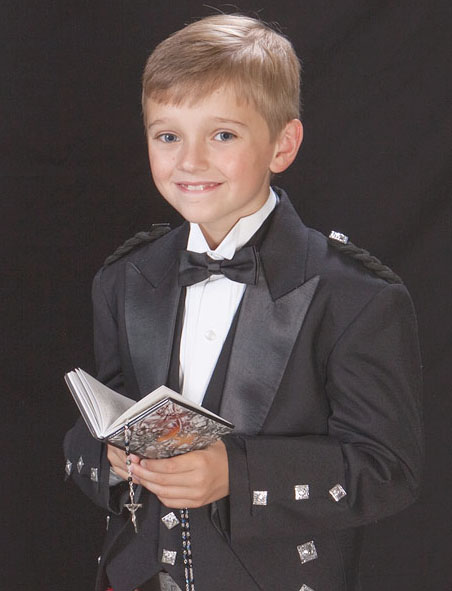
If the fill was increase more and key reduced to keep the highlights exposed the same in the white shirt? The shadows which were reproduced as seen by eye (black) would begin to look washed out and the overall image tonal range flat:
Conclusion? Only one ratio will fit the full range to the sensor. But that creates a problem. What if I want the shadows on the face to be darker than the \"fit the range\" sensor response reproduces them?
Since any overall reduction of fill would cause a loss of detail in the shadow the options at capture would be to adjust the fill so it darker on the face than on the suit. That could be done by \"feathering\" the fill source, aiming away from the face.
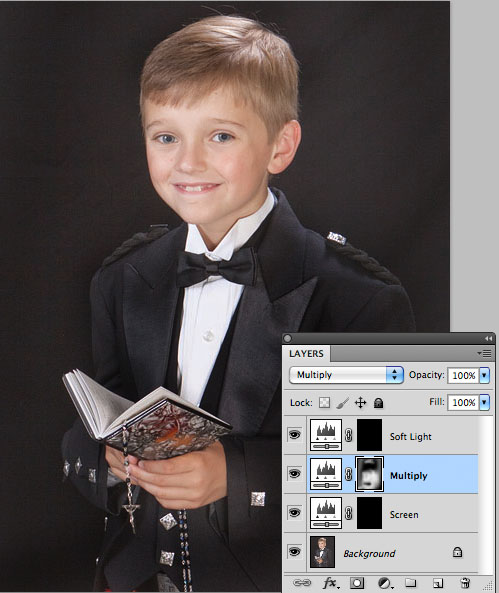
But what I find easier in the age of Photoshop is to record the subject range to fit the sensor in the camera then modify the mid-tone values in post processing. That can be done many different ways in ACR at the RAW stager or in Photoshop after the RAW adjustments are made. My preference is to use adjustment layers in Photoshop as shown below:
I\'ll typically start with a slightly overfilled capture on the RAW, especially with black content because when dark shadow in the subject are recorded as seen on the threshold of the sensor\'s range they are noisy. Overfilling at capture eliminates much of the noise from capture. When I darken the over filled areas with the Multiply layer by opening the mask I can get the same black tone, but with more detail and less noise. I can also apply the changes selectively to do things like put more detail in the shadow of the book (a gift from grandma) or more separation in the lapels than would have been in a SOOC shot exposed with \"normal\" seen by eye shadow detail.
it\'s a case of an old dog learning a new trick as the tools evolve. But in concept its no different that what I did years ago with the zone system. Negatives where adjusted to scene range so a straight no adjustments ZS print I made would have a full tonal range and detail in all the shadows that weren\'t void areas, then I\'d burn and dodge where I wanted to reveal or de-emphasize detail when making the print.
Once I realized how easy it was to just set lights based on shadow and highlight detail make adjustments to the ratio on the face mid-tone in Photoshop I changed the way I set-up studio from metering ratios by number to simply adjusting fill for detail on a draped black towel and key and rim light for detail and rim/key ambient on using a white one to record a full range of detail as my starting baseline \"negative\" as with the zone system. That produces a \"normal\" looking result SOOC works fine for most subjects because I don\'t as a rule do moody character studies and the like using very dark shadows on faces.
Nowadays my incident meter mostly sits on the shelf next to the film cameras, CD player, cassette recorder, and other really nice but functionally obsolete gear.
Jan 17, 2013 at 03:23 PM
Previous versions of cgardner's message #11277758 « Fill, Ratios and Sensor Range »