Thank you so much for taking time and doing some checks on it. I do not see the photo for some reason, but I understand what you tried to do the pixelated edges better by duplicating & applying Gaussian blur. PS is better overall when it comes to manipulating pixel details, but I do not use it (I use Affinity Photo). Also, my pixel editing skills are pretty basic. I guess I need to spend more time on it.
Once again, thank you very much for your guidance. Highly appreciate it. Have a great weekend!
Thanks,
Sreedhar.
Hi @Sreedhar
The image now is posted where it was not working before. It would not show from Dropbox so had to link it another way.
Hope that shows the slight difference that one ca create with selected 1/2 pixel bluring.
John Wheeler
John Wheeler wrote:
Hi @Sreedhar
The image now is posted where it was not working before. It would not show from Dropbox so had to link it another way.
Hope that shows the slight difference that one ca create with selected 1/2 pixel bluring.
John Wheeler
John,
I can see the photo now. Thank you so much, I will give your suggestion a shot in my next resizing.
Sreedhar.
John Wheeler wrote:
HI @Sreehat
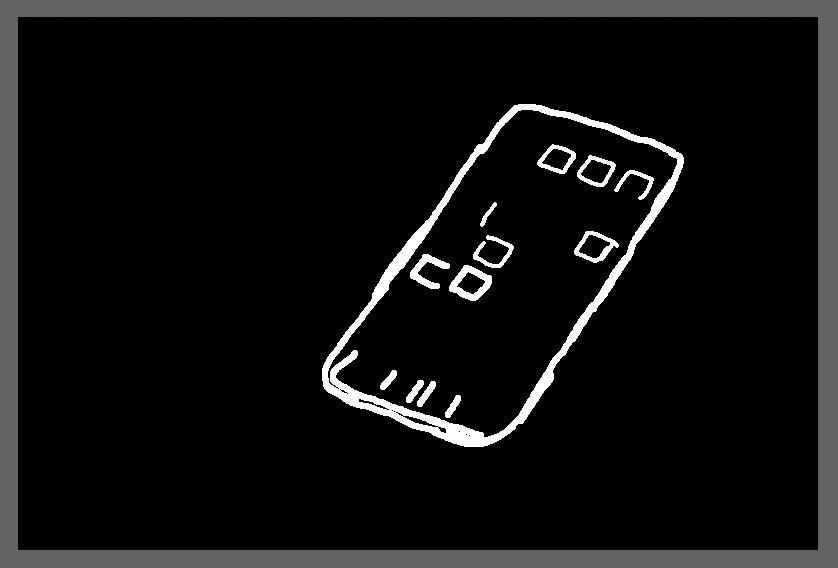
Actually I think the 800 px image is pretty good. I looked at several images on the W2 forum, and theirs are not better, other than their edges are a bit blurred (0.5 to 1.0 pixel blur). For you image, I took the 800 pixel image in Photoshop, added a duplicate Layer and set the Gaussian blur to 0.5 pixle, added a Layer mask set to all Black, and then just painted white around the edge of the phone and around high contrast app icons on the screen. I am attaching (I hope) the image below that I modified. By hidiing just some of the rought edges it does not catch the eye and is slightly more pleasing I think. Just wanted that option out there for you to consider:
That image looks much better than the original to my eyes. The specific differences are hard to point to, but the overall effect is much more pleasing to my eyes. I use Lightroom Classic, but I know almost nothing about Photoshop. I wish I did so that I could understand what you did in Photoshop and the specific steps it took to do it. For example, what do you mean that you "painted white"?
Hi @chiron
This can be done in the more recent versions of Lightroom as well that have maksing capabilities.
First, one of the issues with Lightroom (going by memory) is that when resizing, you don't have a choice in the rendering algorithm. It employs one rendering approach for upsizing and a different one for downsizing. You don't get to choose. In photoshop you can choose and if one uses a rendering algorithm that gives a softer edge (e.g. bicubic (smooth gradients) you avoid some of the sharp pixelization.
Photoshop allows Layers so all I did was add a Layer above the original, blurred in 0.5 pixels with Gaussian Blur and then applied a mask so where I effectively used the blur in selected areas. Below is the picture of the mask I used that I quickly drew with a brush going around the outside edges and the edges of the App icons that looked the most pixelated to me. Once you get rid of the worst offenders the eye ignores many of the others. So it did not take much to get that somewhat more pleasing to the eye look:
I have not done it yet one should be able to do the same thing with the Photoshop Camera Raw Filter (or Lightroom) using the brush masking functions and setting appropriate sliders to brush in a softer edge.
I can give more details with the photoshop Layer stack if needed yet hope this gives you a better idea of what I did.
John Wheeler
John Wheeler wrote:
Hi @chiron@
This can be done in the more recent versions of Lightroom as well that have maksing capabilities.
First, one of the issues with Lightroom (going by memory) is that when resizing, you don't have a choice in the rendering algorithm. It employs one rendering approach for upsizing and a different one for downsizing. You don't get to choose. In photoshop you can choose and if one uses a rendering algorithm that gives a softer edge (e.g. bicubic (smooth gradients) you avoid some of the sharp pixelization.
Photoshop allows Layers so all I did was add a Layer above the original, blurred in 0.5 pixels with Gaussian Blur and then applied a mask so where I effectively used the blur in selected areas. Below is the picture of the mask I used that I quickly drew with a brush going around the outside edges and the edges of the App icons that looked the most pixelated to me. Once you get rid of the worst offenders the eye ignores many of the others. So it did not take much to get that somewhat more pleasing to the eye look:
I have not done it yet one should be able to do the same thing with the Photoshop Camera Raw Filter (or Lightroom) using the brush masking functions and setting appropriate sliders to brush in a softer edge.
I can give more details with the photoshop Layer stack if needed yet hope this gives you a better idea of what I did.
John Wheeler...Show more →
Hi John.
Thank you very much for the excellent explanation--it helped a lot. I am using the masks in LRC, but hadn't thought about doing what you did.
I am interested in using these kinds of techniques apart from resizing, where they might help to improve the pleasing look of a full-sized photo. Any further explanation that you would be willing to give on the PS Layer stack, I would be very interested to read. I found your explanation so far very clear!
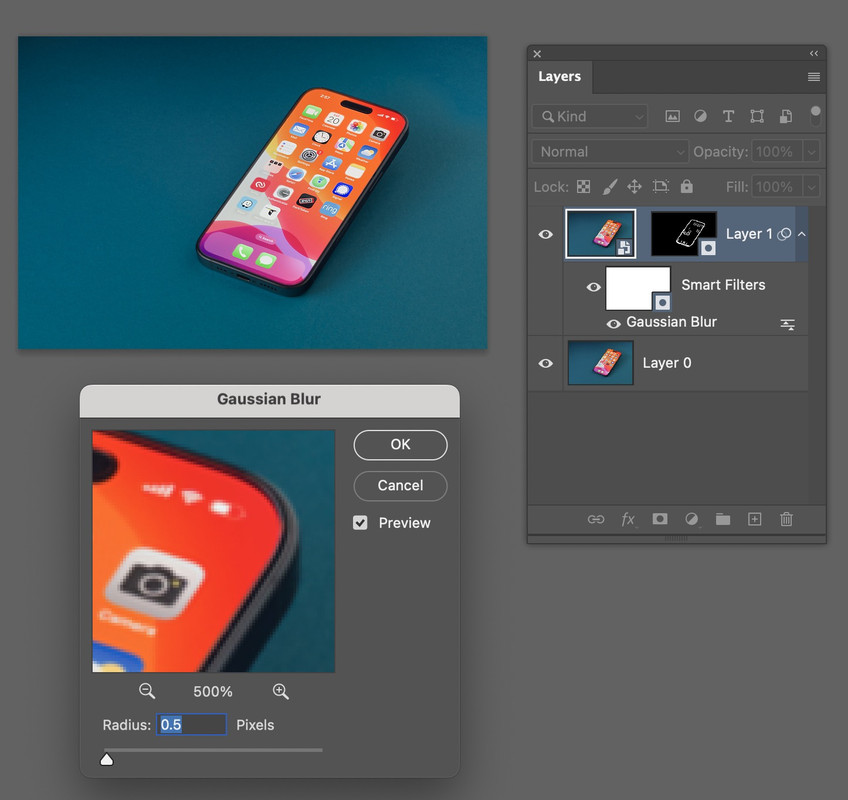
The picture below shows the document image with the Layer Stack on the right and the Gaussian blur panel on the bottom.
I duplicated the original image to make the second Layer. I turned that into a Smart Object. Having it as a Smart Object allows you to go back and easily make changes to the blur. I added the mask I previously posted to that second Layer. It initially shows up as all White when added. I inverted it by clicking on the mask, and then using Cmd+I (Ctrl+I on PC), which made it all black. Using the brush tool set to white, I painted white on the mask along the outside edges and in any areas where pixelization was noticeable.
This could have been done with a single Layer in Photoshop by just using the Filter Mask of the Smart Object (the white Mask square next to where it says (Smart Filter) instead of the Layer Mask. It gives the same result yet its easier to explain with the two Layers.
Hope this helps
John Wheeler
Something I have not tested personally is that conversion to jpeg might be better if done directly from a file that has more than 8 bpc colour rather than from a file that has already been dumbed down to 8bpc. So, if you go from raw file to dng to jpeg then it might pay to ensure the dng has 10 or more bpc. Going directly from raw to jpg might be better still. The premise for this thinking is that the converter software has the maximum amount of source information to work with.
Even so, some software might use cleverer conversion techniques than others.
800 pixel width is pretty small by today�s standards, especially if you are displaying electronically on the web and similar in browsers.
You can�t avoid losing a lot of detail if you go that small, especially if the image gets displayed at old-school resolutions like 72ppi.
If you are doing web images, I�d go for higher pixel dimensions ��at least twice as high � and then set the ppi of the image to something like at least 144ppi. Modern browsers will respect that setting and display the image smaller with higher resolution.
Also, after downsizing to create these smaller images, you may want to do a bit of small radius sharpening on them.
Hope that helps.
guywithgas wrote:
Experts,
I am facing some issues while I resize my images to JPEG (specifically downsizing them to 800 pixels on the longer side ). The resulting JPEG is losing a lot of detail. I understand there will be some loss, the but I see a lot of reduction in quality. I tried all the algorithms that are there in the software and none of them are helping me. Please help me identify what I am doing wrong?
More context:
I use a Nikon Z9 and it has a higher mega pixel count. As RAW processing software, I use DXO Photolab 9. Considering the fact that it is a resonably high megapixel sensor and Photolab is a good raw processing software, I was using "Bilinear" mode for downsizing ("Biculbical" is good for upsizing). To my surprise, the resulting image lost a lot of detail.
My thoughts were, okay Z9 has a higher megapixel sensor. Ad the downsizing could result in loss of data as the pixel pitch is small and I am downsizing them. Let me try with a lower megapixel sensor. I have a D4S as well and that is a 16MP camera, far lower than the Z9. My thought process was with better pixel pitch, if I downsize I should get reasonably good output. surprisingly same, results or in some cases worse than what I found with my Z9.
To eliminate software influence, I converted the RAW files after processing and exported them to DNGs (with corrections applied) and used Affinity photo for downsizing. It has a couple of options more than the regular "biliner" & "bicubical" algorithms offered by Photolab. One of them gave me slightly better output, but pretty insignificant.
So, I am reaching out to the community for any suggestions. Other than asking me to use Photo Shop/Capture One. I like both of them and used them in the past, but would not use them due to their subscription only options anymore.
PS: The lens resolution is out of context, as I used one of the best Zeiss lenses available with me. Anyhow, irrespective of the lens resolution, the post processed RAW image looks excelled on my calibrated monitor.
Depending on the picture and the desired output dimensions, Lanczos seems to be often the best method for photography. Sometimes Mitchell, Gaussian or Nearest neighbour works better. Other methods aren't that good for photos but works better for stuff other than photos.
John Wheeler wrote:
Hi @chiron@, yes I can provide more details.
The picture below shows the document image with the Layer Stack on the right and the Gaussian blur panel on the bottom.
I duplicated the original image to make the second Layer. I turned that into a Smart Object. Having it as a Smart Object allows you to go back and easily make changes to the blur. I added the mask I previously posted to that second Layer. It initially shows up as all White when added. I inverted it by clicking on the mask, and then using Cmd+I (Ctrl+I on PC), which made it all black. Using the brush tool set to white, I painted white on the mask along the outside edges and in any areas where pixelization was noticeable.
This could have been done with a single Layer in Photoshop by just using the Filter Mask of the Smart Object (the white Mask square next to where it says (Smart Filter) instead of the Layer Mask. It gives the same result yet its easier to explain with the two Layers.
Hope this helps
John Wheeler ...Show more →
Hi John. I missed seeing this somehow!
Thank you so much for the additional details--they are very helpful. I need to spend some time learning the use of layers in PS, and I will use my understanding of what you have done here as a guide to what I need to learn to do
I appreciate the explanations!
As a matter of fact, the details on the painting have already helped me with my masking in LRC.
gdanmitchell wrote:
If you are doing web images, I�d go for higher pixel dimensions ��at least twice as high � and then set the ppi of the image to something like at least 144ppi. Modern browsers will respect that setting and display the image smaller with higher resolution.
As the OP pointed out in his first post, he is asking about 800 pixels wide when he is constrained by the Weekly Assignment Rules:
WA rules
Your submission MUST have exactly 800 pixels for its longest dimension (no less, no more). Since entries can have a maximum dimension size of 800 pixels, it's advisable to keep them free of frames. However, Upload & Sell members may use the preset frames as they won't affect image size.
Imagemaster wrote:
As the OP pointed out in his first post, he is asking about 800 pixels wide when he is constrained by the Weekly Assignment Rules:
Apologies for that oversight. I realized he was going for 800 pixels wide, but missed that this was a requirement.
The advice regarding applying a bit of small radius sharpening will still apply, though it may not be the only technique to use.
(As a further aside, it may be time for someone to revise those posting requirements. Back when I first started posting images online ��and the networks were way slower and people were using old-school analog modems � we thought that 800 pixels was pretty big, and 640 was perhaps more common. But today, when screen pixel resolution is often much higher than 200ppi and when network constraints are rarely an issue, something a bit larger would make sense. Anyone who agrees might want to contact Fred Miranda directly and/or post in the Forum and Miscellaneous thread.)