ctgoldwing wrote:
I have been shooting birds at the local wetlands. The only position I can shoot some of the nesting ones puts them in the foreground with a totally blown out background. I've spent some time in LRC trying a bunch of things and just can't seem to get an acceptable image. I have tried the various sky replacements with meh success. . .
Any suggestions would be appreciated. This is my most recent iteration.
Reminds me of the image I shot of a great egret, when I was really learning a lot of pp, that had me realizing I need good light. Your image isn't bad, for sure, I think mine had a shadow across the neck in harsh midday light or something. But sky in the frame on a subject in shade/cloud coveted sun isn't the best, either
One birding site I used to be on just outright banned nest photos. You see them on here, tend to be a least somewhat cringe worthy. You hope nobody messed up a birds nest for photos, bitd populations tend to be in the toilet
If you are determined to try , it's important to realize that just because you get blinkies doesn't mean the raw is blown out. You'd probably have to overexpose the sky as much as possible (raw processors can probably do Ok replacing sky, if needed) and pick up the exposure on the bird.
To the OP, one thing you could try, is to add a mask such as a radial gradient on the blown out area, and then go to the colour module and choose "solid colour". Then click and drag the eye dropper to an area of the sky which has colour, and that coloured will be overlayed into the mask, filling the blown out highlights with said colour. You could also try using a brush instead of a radial gradient. You could also experiment with intersecting that mask with a luminance range mask and limit the luminance to just the brightest part of the image.
dakel wrote:
To the OP, one thing you could try, is to add a mask such as a radial gradient on the blown out area, and then go to the colour module and choose "solid colour". Then click and drag the eye dropper to an area of the sky which has colour, and that coloured will be overlayed into the mask, filling the blown out highlights with said colour. You could also try using a brush instead of a radial gradient. You could also experiment with intersecting that mask with a luminance range mask and limit the luminance to just the brightest part of the image....Show more →
That's another useful approach to try.
I like the idea of applying the luminance range mask, but I'm betting that it will require a few additional tweaks to make it work. One would expect to constrict the range quite a bit, since you want to minimize the spillover of the effect into adjacent areas that are not blown out. Another, In combination with that, is to use the option in the ACR (or, I assume, LR) mask tool to subtract unwanted areas from the mask and eliminate the effect from areas outside the blown out spots. (A hard 100% brush works well for areas no where near the blown out spot, while a softer brush and perhaps less than 100% intensity may let you blend the edges more effectively. You an also apply a curve to the masked areas to help avoid unwanted darken gin and you drop the intensity of the brightest highlights.
Process the raw multiple times say, once for the sky, the other for the bird, maybe others if you think it might help. Blend using layers. Lets you use noise reduction on the bird if you want for one thing, just kinda paint images together using a soft brush, generally pretty easy imo
It isn�t exactly �discarded� by Adobe profiles. The data are all still there. It can be subject to a different curve that may open one end of the luminosity spectrum and narrow another, etc.. Choosing a different profile is one quick way to apply a curve that may be more appropriate to a given raw file. Another is to use the controls in your raw converter to customize the adjustments for your image.
The way in which I handle a similar situation is to use just a smidgeon of Flash to even-up the lighting between the foreground birds and the dawn-sky background. Depending on your flash, you may only need to use it at 1/8 power.
This may have been shot from the self-same boardwalk as yours?
----
Seems that I can't post the link but you can try entering it directly in a Browser to see what I mean?
It's the third image in the series at that link
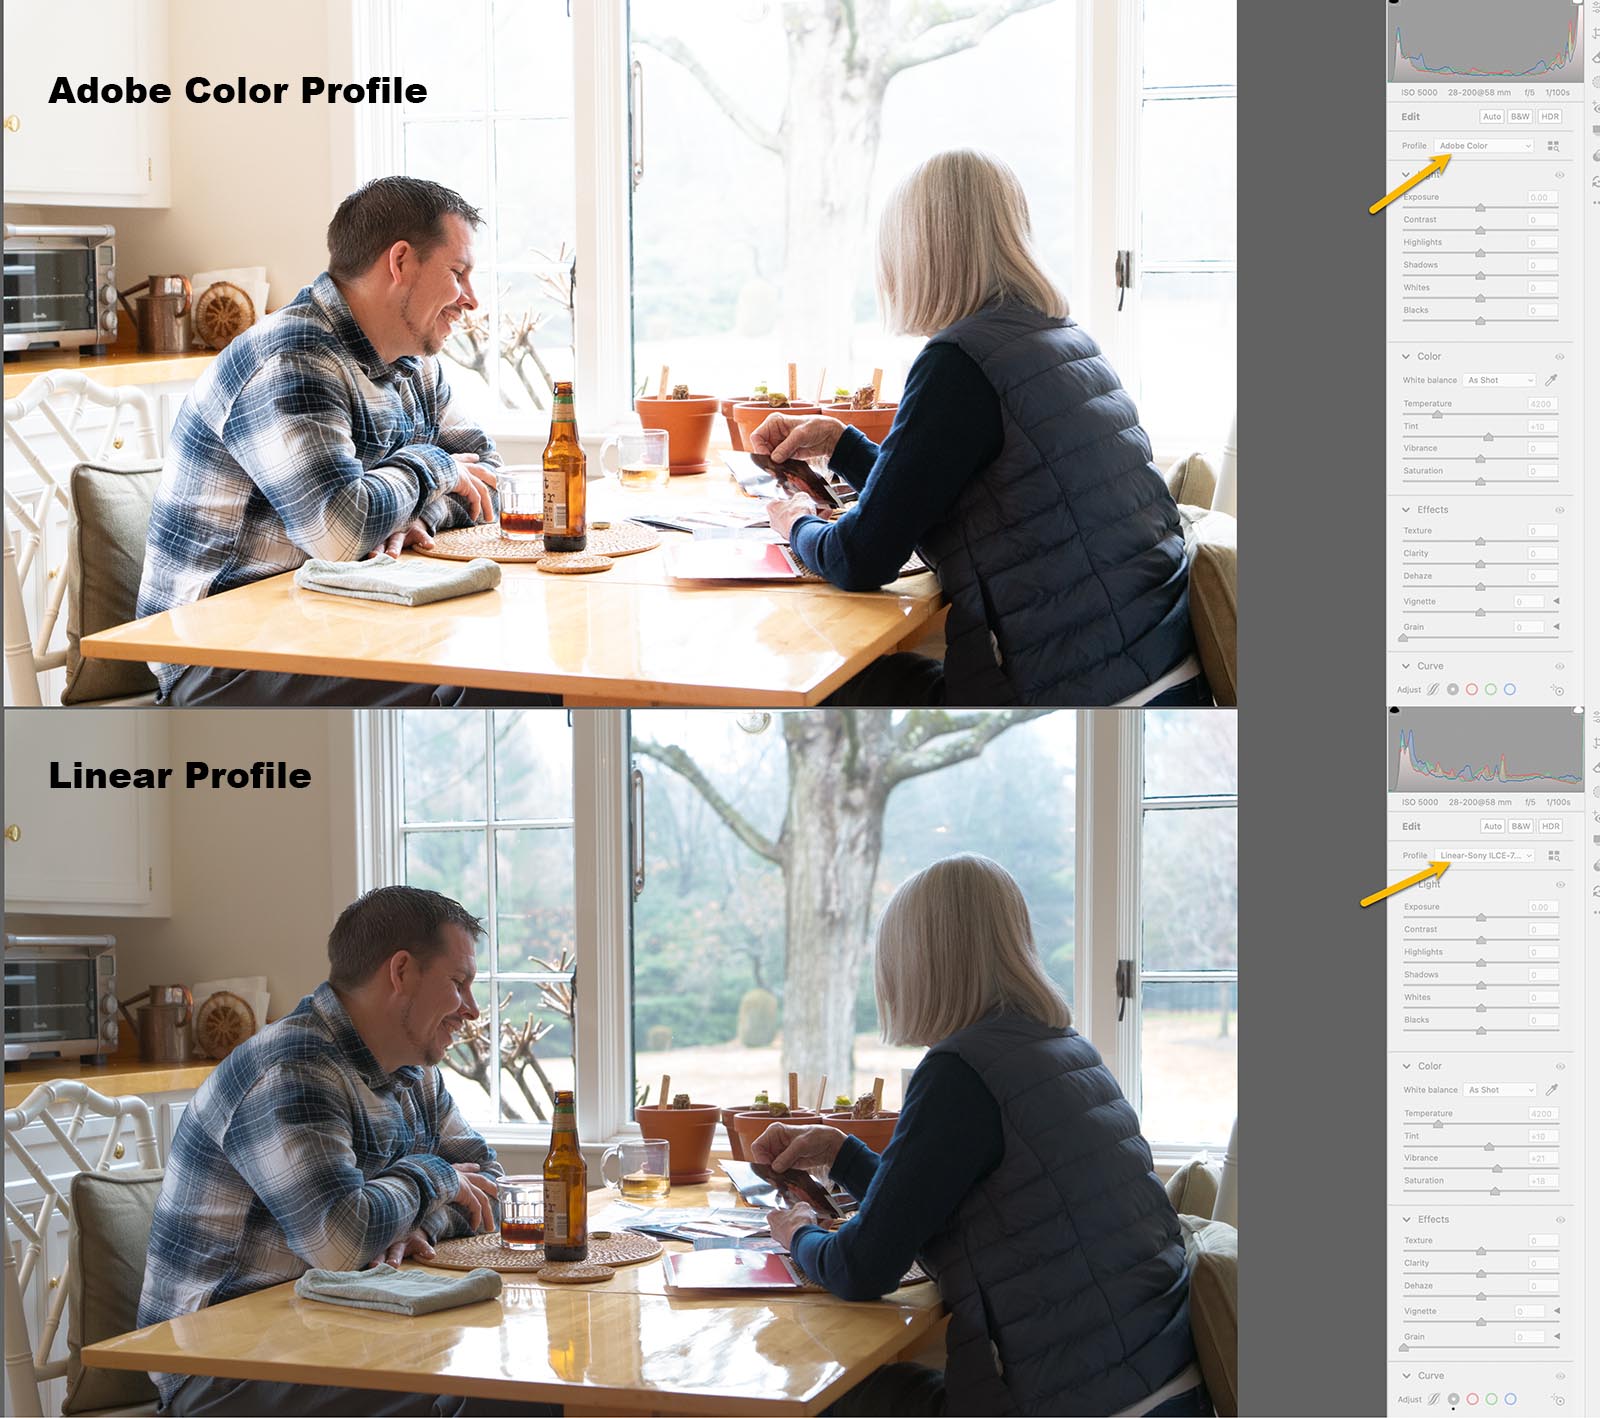
Here's another experiment: using the Adobe Color profile, we try to recover detail from an apparently over-exposed sky.
The first image shows the Adobe Color profile. Note the histogram: the high values fit within the tonal scale, but just barely.
The second image shows the Linear Profile: there is "wiggle room" at the high end of the tonal scale.
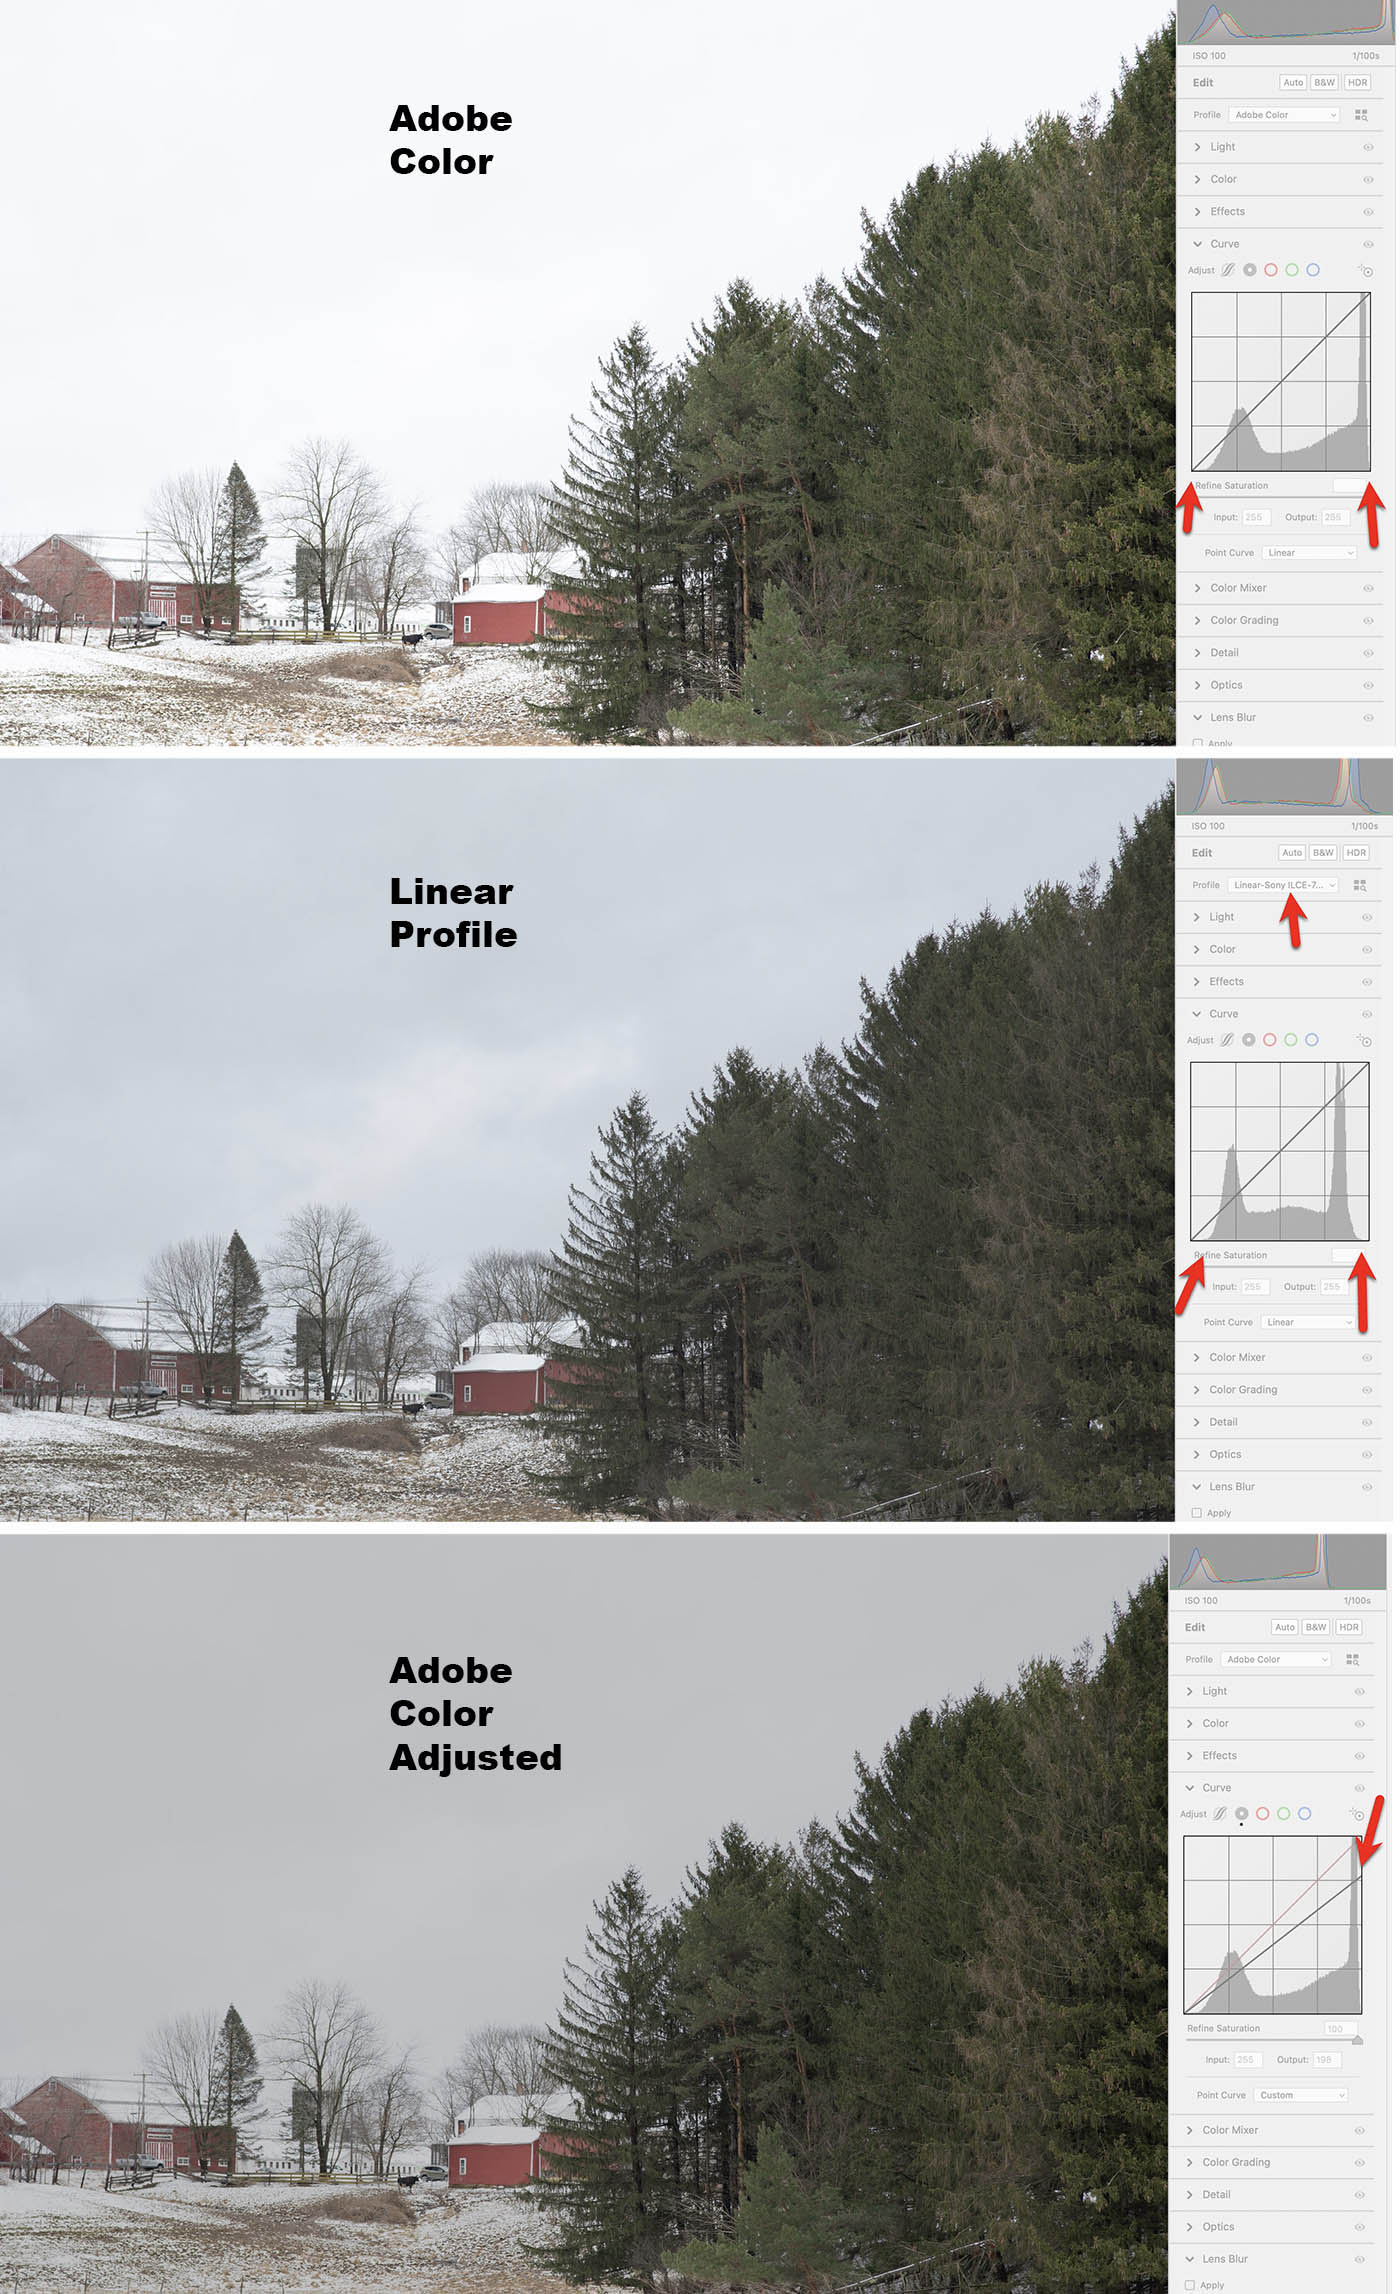
The third image shows what happens if we try to rescue details in the sky from the Adobe Color version. The result is flat gray.
Comment: Perhaps the Adobe Color profile is automatically expanding the tones outwards, to fit the extremes. The result is that the sky, which actually contains color and texture, is blown out to white. The details in the sky cannot be recovered. They have been discarded.
Kenneth Lee wrote:
Here's another experiment: using the Adobe Color profile, we try to recover detail from an apparently over-exposed sky. https://www.kennethleegallery.com/images/forum/fredmiranda/LinearComparisonBarn.jpg
The first image shows the Adobe Profile. Note the histogram: the high values fit within the tonal scale, but just barely.
The second image shows the Linear Profile: there is "wiggle room" at the high end of the tonal scale.
The third image shows what happens if we try to rescue details in the sky from the Adobe Color version. The result is flat gray.
Comment: Perhaps the Adobe Color profile is automatically expanding the tones outwards, to fit the extremes. The result is that the sky, which actually contains color and texture, is blown out to white. The details in the sky cannot be recovered. They have been discarded.
Please correct me if I have overlooked something. ...Show more →
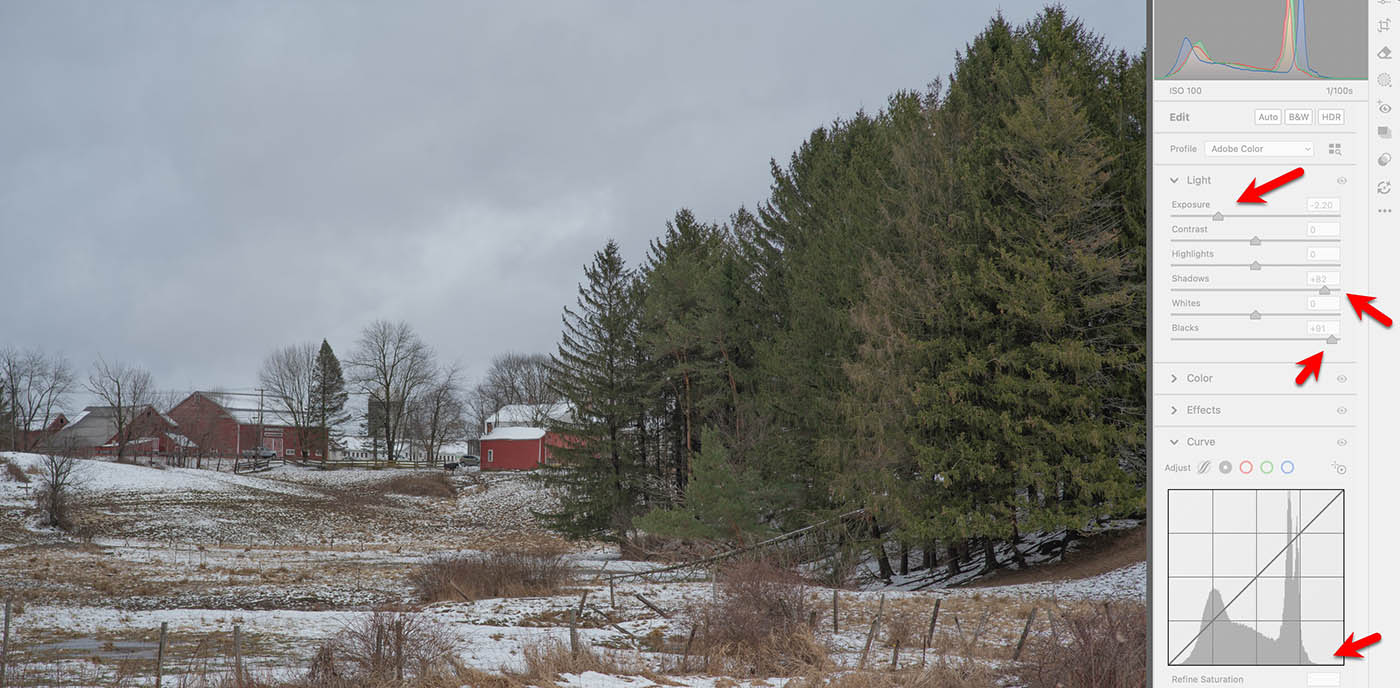
I was going to say, that original Adobe example was simply overexposed by the looks of it. Dragging the whites down on the tone curve is comically deleterious compared to actually editing the file correctly.