


DIY: How To Mount Speedlight To A Softbox
Who would guess the plumbing department of the hardware store can improve your photography? I was never successful at portrait photography. The pics I took always made the victim look like a zombie. After much reading I figured out I needed a light modifier. I needed a softbox!
Click on any of the photos to see a larger view. Use your back button to get back.
")
A softbox is a device that changes the light of a flash from harsh direct light to soft light coming from multiple directions.
A good quality softbox costs $400 or more, something pros can afford. I wanted low cost. The low cost ones available have a reputation of not lasting very long, I wanted rugged.
Several times I have ordered what is known as a “Grabbox” from KEH Camera. A Grabbox is basically a box full of miscellaneous camera gear, mostly good, but, you are seldom sure what you will get. The cost of a grabbox is so low they are fun to order. For about $10 you get a whole box of goodies to tinker with.
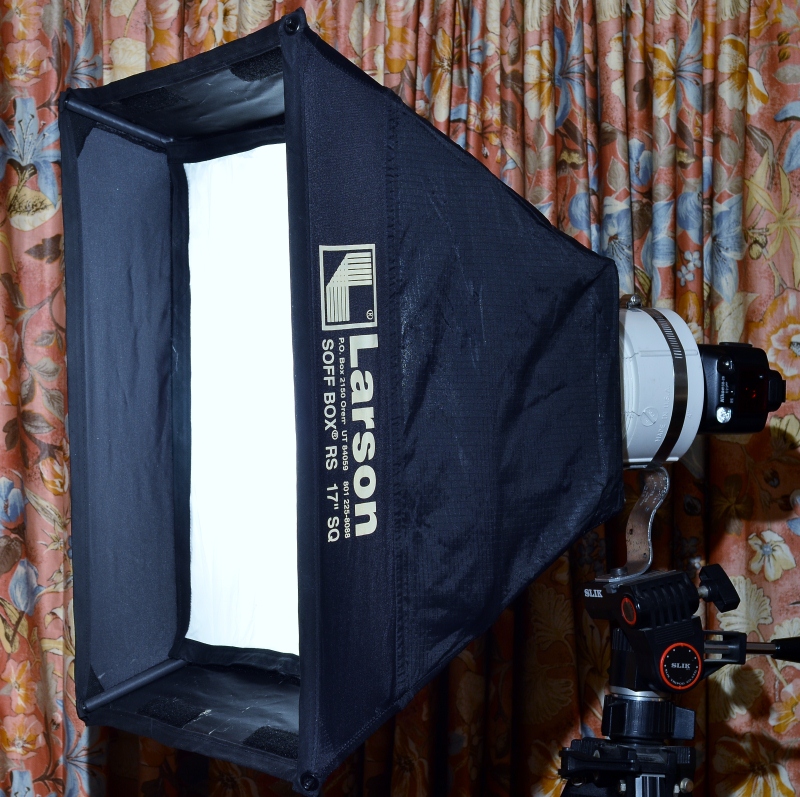
One box had this square aluminum plate with several items bolted to it. About a year later, another grabbox had a 17″ x 17″ Larson Soff Box, minus the backing plate/spin ring. Low and behold, the 2 items fit together.
I had a softbox!
")
Now I needed a way to connect a flash to the softbox and mount the softbox to a tripod/stand.
Off I went to the big box hardware store with the mounting plate in hand. I walked the electrical aisle, then the plumbing. I found just what I needed in the plumbing section, a 4 inch schedule 40 PVC male adapter and 2 geared hose clamps.
I then walked down to the lumber area and got a 8 inch heavy duty tie strap. I had a 1/4×20 nut at home, so I now had everything I needed.
The threaded end of the 4 inch adapter was about 1/8 inch too large. I needed the adapter to clamp tight to the spin ring of the softbox.
")
A few hacksaw cuts later, the end of the PVC adapter had a series of tabs left at one end. The gear hose clamp could now tighten the adapter to the spin ring.
The heavy duty tie strap was bent into kind of a “U”. I drilled a 1/4″ hole so the strap could be attached to a tripod.
The tie strap and PVC pipe adapter were clamped to the spin ring of the softbox. Done.
")
My first photographs were better than any I had ever taken!

My $9 modification of a $10 softbox worked. Now I needed a way to secure the speedlight into the pipe adapter. I had some heavy duty foam about 1 inch thick. I cut a 3 inch wide strip 12 inches long.
")
The foam formed a perfect, tight fitting, pocket to hold the SB-600 flash.
")
I also tried the SB-26 flash, it fit also.
")
Using the SB-26, the optical slave on the flash allows me to use the softbox as a wireless flash. The SB-600 will do this also.
The way the PVC pipe adapter clamps to the spin ring, the softbox can spin.
")
")
Being able to spin the softbox is important if you are using baffles on the front of the softbox for situations like making shadows on a back drop.
So, if you have a softbox, and need to power it with a speedlight, hit the plumbing section!
")
2 Responses to “DIY: How To Mount Speedlight To A Softbox”
Leave a Reply

It?s Actually A Cool And Useful Piece Of Information. I Am Glad That You Shared This Useful Information With Us. Please Keep Us Up To Date Like This. Thanks For Sharing.
thank you…it was useful for me and my wallet